
How to dry your own sage, thyme and parsley herbs
This month's notes: August 2025: Stored US apples are still available. See your state's crop availability calendar for more specific dates of upcoming crops.
Valentine's Day - February 14 - See this website for Valentines Day history, facts and top picks for fast, easy, inexpensive gifts for the man, woman or children in your life!
Easter will be April 16, 2017 - if you want to take your children to a free Easter egg hunt - see our companion website to find a local Easter Egg hunt!
And we have home canning, preserving, drying and freezing directions. You can access recipes and other resources from the drop down menus at the top of the page or the site search. If you have any questions or suggestions, feel free to write me! Also make your own ice cream; see How to make ice cream and ice cream making equipment and manuals. Have fun, eat healthier and better tasting, and save money by picking your own locally grown fruit and vegetables, and then using our easy directions
 Subscribe
to our: Email
alerts; Follow us on Twitter
Add
this page to your favorites! -
Email this page to a friend, or to yourself
Subscribe
to our: Email
alerts; Follow us on Twitter
Add
this page to your favorites! -
Email this page to a friend, or to yourself
How to dry sage, thyme, summer savory, dill, bay leaves, oregano, rosemary or marjoram - From fresh garden plants!
Imagine how your dishes will taste this winter if you have your own garden herbs to add to them. Sage, thyme, summer savory, dill, bay leaves, oregano, rosemary and marjoram are less tender, low-moisture that are easy to dry or freeze some for a year-round supply of good quality herbs! Here's how to do it, complete instructions in easy steps and completely illustrated. You don't need any special equipment: air drying or room drying is the easiest, as well as, most inexpensive method for preserving herbs. Moisture evaporates slowly and naturally during air drying, leaving the precious herb oils behind. Dehydrators are useful if you want to dry large quantities of herbs or you have high moisture herbs such as basil.
Ingredients and Equipment
- Fresh Sage, thyme, summer savory, dill, bay leaves, oregano, rosemary or marjoram - any quantity.
- string (or dental floss)
- Ziploc bags, glass or plastic containers, OR Vacuum food sealer with bags
- paper bags
Instructions
Step 1 - What to look for
The best time to cut herbs for drying is just before they flower. This is when the leaves have the most oil, which is what gives herbs aroma and flavor. Different varieties of herbs flower at different times of the season, so look for buds or newly opened flowers as your clue for harvesting. But, if your herbs have already flowered, they can still be harvested and dried. Cut herbs when the leaves are dry, either late morning or early evening but not in the hot midday sun.
Step 2 - Cut the herbs
Use a sharp knife or scissors to cut large stems or branches from mature plants. Gently shake each branch to remove insects. Examine each branch and remove old, damaged or diseased leaves.
Step 3 - Rinse the herbs
Rinse each branch in cold water and dry with towels or paper towels to remove all visible water. Wet herbs tend to mold which destroys the whole bunch.
Step 4 - Remove lower leaves from the stems
Turn branches upside down and remove leaves along the upper stem. Lower leaves are not as pungent as the younger, top leaves nearest the buds and growing tips. Tie five or six stems together in a small bunch. For high moisture herbs, use smaller bunches.
Step 5 - Put the tied branches into a paper bag to air dry
Place the bunch upside down in a large brown paper bag. Gather the bag around the stems and tie. Tear or cut several holes in the bag for ventilation. Make sure there is plenty of room inside the bag so leaves do not touch the sides of the bag. Write the name and date on each bag.
Alternative: a dehumidifier
If you have a dehumidifier, I have found that spreading the branches loosely
on a cake cooling rack (which allows the air to circulate) and placing this
by the outlet from the dehumidifier, where the warm and very dry air exits the dehumidifier works
great, and much faster!
dehumidifier, where the warm and very dry air exits the dehumidifier works
great, and much faster!
Dehydrators (see this page for more info, models and prices of food dryers) are faster, easier and more useful if you want to dry larger quantities of herbs or you have high moisture herbs such as basil.
Step 7 - Dry the herbs
Hang the bag in a warm, airy room - an attic works great! Leave undisturbed for about two weeks or longer. As the leaves are dry, check for any signs of mold growth. Toss the entire bunch if moldy and try again.
Step 8 - Separate the leaves from the stems
Strip dried leaves from stems and discard the stems. Crush the leaves if desired, but whole herbs retain their flavor longer than crushed, ground or rubbed herbs. I wait until I use the herbs later, to crush them.
Step 9 - Storing the herbs
Store dried herbs in small airtight containers away from the light. Zip closure plastic bags, glass or plastic containers all can be used for storage. My preference is FoodSaver vacuum bags - it removes all the air, so the dried herbs retain more of their flavor. TIP: If you don't own a vacuum food sealer to freeze foods, place food in a Ziploc bags, zip the top shut but leave enough space to insert the tip of a soda straw. When straw is in place, remove air by sucking the air out. To remove straw, press straw closed where inserted and finish pressing the bag closed as you remove straw.
Be sure to label and date each container.
Store herbs in a cool, dry, dark place (away from sunlight). Dried herbs keep for years but for best results use within a year. Most herbs will diminish in flavor with age and a larger amount will be needed to achieve the desired flavor in cooking.
Tips
Sage is the only herb that will grow stronger in flavor during storage. For making rubbed sage, place dried leaves in a wire strainer or sieve over a plate and rub against the side. Sage is a strong herb and rubbing creates smaller pieces for more even distribution in recipes.
To release the full flavor, crush whole herb leaves or use a mortar and
pestle to grind, just before adding to the recipe. When using dried herbs,
add to soups and stews during the last half-hour of cooking or follow recipe
directions. Be creative and add dried herbs to flavor your favorite foods.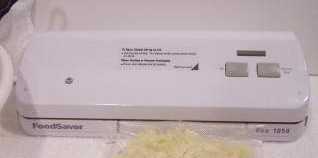
A vacuum-sealed FoodSaver bag is on top at left. You can see how the FoodSaver really sucks out all the air, so the herbs won't dry out or get freezer burn. That means the food inside will last many times longer. I've been using them (and their predecessor in the marketplace, Seal-a-Meal) for many years.
If you're interested, here's more information and where you can get a vacuum food sealer.
Picking Tips
[General picking tips and a guide to each fruit and vegetable] [How
much do I need to pick?
(Yields - how much raw makes how much cooked or frozen)] [Selecting
the right varieties to pick] [All
about apple varieties - which to pick and why!] [Picking tips for Vegetables]
[ Strawberry picking tips]
[ Blueberries picking tips]
Illustrated Canning, Freezing, Jam Instructions and Recipes
[ All About Home Canning, Freezing and Making Jams, Pickles, Sauces, etc. ] [FAQs - Answers to common questions and problems] [Recommended books about home canning, jam making, drying and preserving!] [Free canning publications to download and print]
