
Strawberries: How to Freeze Strawberries
How to Freeze Strawberries!
 (also
works for blackberries, raspberries, gooseberries, tayberries,
loganberries, saskatoons, cranberries, marionberries,
boysenberries, etc.)
(also
works for blackberries, raspberries, gooseberries, tayberries,
loganberries, saskatoons, cranberries, marionberries,
boysenberries, etc.)
If you like strawberries in the winter, for cobblers, dessert, or just in a bowl; just imagine how good it would taste if you had picked a couple of quarts fresh or bought a them from a farm stand and then quickly froze them at home! It is also one of the simplest ways to put up a fruit for the winter. Here's how to do it, complete instructions in easy steps and completely illustrated. Your own frozen strawberries will taste MUCH better than anything you've ever had from a store. Strawberries are different in that you must remove the hulls (the green cap) after washing, but otherwise the same as other berries. See this page for easy strawberry jam and preserves recipes and complete directions. To freeze blueberries, see this page (there are a few differences).
Directions for Freezing Strawberries
Ingredients
- fresh strawberries - any quantity
Equipment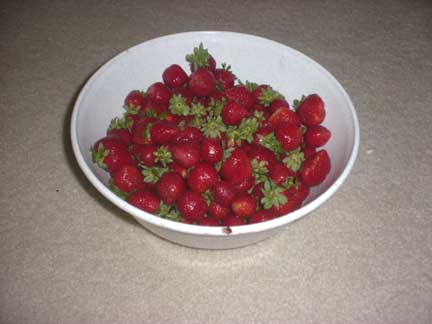
- a pan or tray that will fit in your freezer
- a strainer or colander
- Vacuum food sealer or "ziploc" type freezer bags (the freezer bag version is heavier and protects better against freezer burn.
Instructions
Step 1 - Get the freshest strawberries you can!
Start with the freshest strawberries you can get. Look for plump, full berries with a good color. I've used blueberries as an example, but these directions would equally well for any other berry (blackberries, raspberries, strawberries, etc.) See the picking tips page for other berries.
Step 2 - Wash and sort the strawberries. 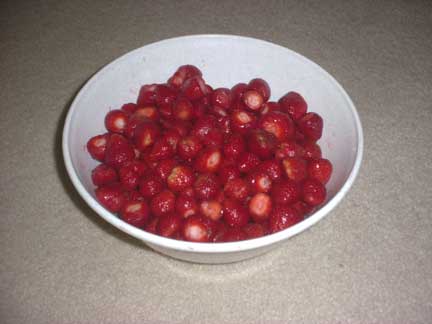
Wash the strawberries in a bowl of plain cold water.
Then you need to pick out and remove any bits of stems, leaves and soft or mushy strawberries. It is easiest to do this in a large bowl of water and gently run your hands through the strawberries as they float. With your fingers slightly apart, you will easily feel any soft or mushy berries get caught in your fingers.
Step 3 - Drain the strawberries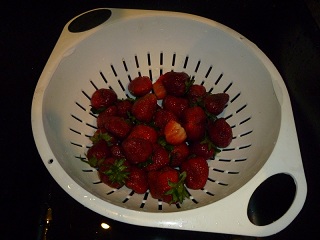
Use a large sieve or colander to remove as much water as possible. I usually let them sit for about 10 minutes in the colander.
Step 4 - Cut the leaves (hulls) off the strawberries
Cut the hulls off the strawberries, then drain the water from them. You
can cut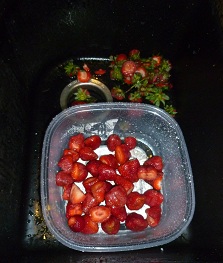 the berries up, or leave them whole, as you like.
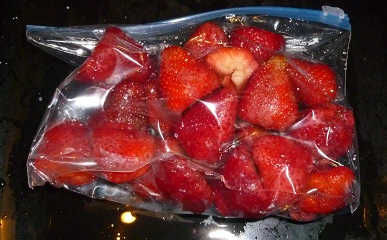
Step 5 - Put them a freezer bag
Pack a freezer bag with the strawberries, and exclude as much as air as you can when you seal the bag.
I love the FoodSavers (see this page for more information) with their vacuum sealing! I am not paid by them, but these things really work. If you don't have one, ziploc bags work, too, but it is hard to get as much air out of the bags. Remove the air to prevent drying and freezer burn. .
If you use the vacuum food sealer, and the berries have a lot of juice or liquid on them, you can freeze the filled, but still open bags and then vacuum seal them, so the liquid doesn't get sucked into the device.
A tip for a low budget vacuum sealer:
To remove the excess air from a ziploc bag, put a straw inside the bag and zip it closed as far as possible. Then suck the air out of the bag, pinch the straw shut where it enters the bag and pull it from the bag and quickly zip the bag the rest of the way.
Pop them into the coldest part of the freezer, or the quick freeze shelf, if your freezer has one!
I leave them in the freezer overnight, to get
completely frozen.
Step 6 - Label the bags!
Of course, you will want to label them with the contents and date, or all this work could be wasted, if you can't identify them later, or don't know how old they are.
Step 7 - Done!
Pop them into the deep freeze, or in the coldest part of your regular freezer!
To use them, just set them in the fridge overnight, or on the counter for a couple of hours. I wouldn't recommend the microwave unless you are planning to cook with them!
Tips:
- Harvest early in the morning, especially if the weather is hot, to get peak flavor.
- Harvest the berries at its peak maturity, but not overripe and mushy.
- Process promptly after harvesting, or keep cooled in the fridge or with ice until then.
Illustrated Canning, Freezing, Jam Instructions and Recipes
[ Easy Home Canning Directions] [FAQs - Answers to common questions and problems] [Recommended books about home canning, jam making, drying and preserving!] [Free canning publications to download and print]
Canning Books, Supplies and Accessories
These are my favorite essential canning tools, books and supplies. I've been using many of these for over 50 years of canning! The ones below on this page are just the sampling of. my preferred tools. but you can find much more detailed and extensive selections on the pages that are linked below.
- Vacuum Foodsealers for freezing, dried foods, and refrigerated foods - the FoodSaver line
- Selecting a KitchenAid mixer and attachments for home canning
- Steam Juicers
- Strainers, pit removers, seed-skin-stem removers, jelly strainers, etc. All types, makes and prices (from $19 to $350)
- Cherry pitters reviews, prices and ordering
- Food dehydrators - easy and fast to dry your own fruits, veggies, sun-dried tomatoes, etc.
The All New Ball Book Of Canning And Preserving: Over 350 of the Best Canned, Jammed, Pickled, and Preserved Recipes Paperback
This is THE book on canning! My grandmother used this book when I was a child.; It tells you in simple instructions how to can almost anything; complete with recipes for jam, jellies, pickles, sauces, canning vegetables, meats, etc.
If it can be canned, this book likely tells you how! Click on the link below for more information and / or to buy (no obligation to buy)The New Ball Blue Book of Canning and Preserving
Canning and Preserving for Dummies by Karen Ward
This is another popular canning book.
Click
here for more information, reviews, prices for Canning and Preserving For Dummies
Of course, you do not need to buy ANY canning book as I have about 500 canning, freezing, dehydrating and more recipes all online for free, just see Easy Home Canning Directions.
Home Canning Kits
I have several canners, and my favorite is the stainless steel one at right. It is easy to clean and seems like it will last forever. Mine is 10 years old and looks like new.
The black ones are the same type of standard canner that my grandmother used to make everything from applesauce to jams and jellies to tomato and spaghetti sauce.
This complete kit includes everything you need and lasts for years: the canner, jar rack, Jar grabber tongs, lid lifting wand, a plastic funnel, labels, bubble freer, It's much cheaper than buying the items separately. It's only missing the bible of canning, the Ball Blue Book.
You will never need anything else except jars & lids (and the jars are reusable)!
The complete list of canners is on these pages:
- Water bath canners - Good for acidic foods, like applesauce, pickles, salsa, jams, jellies, most fruits
- Pressure canners - needed for low and non-acidic foods, like canned vegetables (corn, green beans, etc), and meats
- Canners for glass top stoves if you have a glass or ceramic stove
- Canners for induction stovetops
Pressure Canners
If you plan on canning non-acidic foods and low acid foods that are not pickled - this means: meats, seafood, soups, green beans corn, most vegetables, etc., then you ABSOLUTELY must use a Pressure Canner.
Of course, you can use a pressure canner as a water bath canner as well - just don't seal it up, so it does not pressurize. This means a Pressure Canner is a 2-in-1 device. With it, you can can almost ANYTHING.
There are also other supplies, accessories, tools and more canners, of different styles, makes and prices, click here!
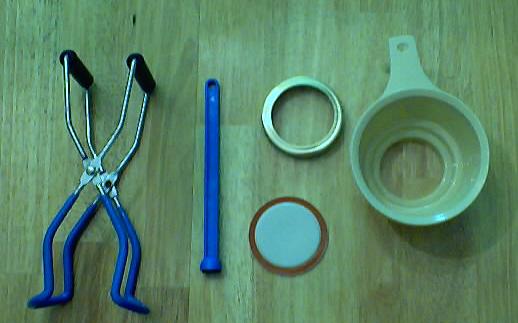
Basic Canning Accessories
From left to right:
- Jar lifting tongs to pick up hot jars
- Lid lifter - to remove lids from the pot of boiling water (sterilizing )
- Lids- disposable - you may only use them once
- Ring - holds the lids on the jar until after the jars cool - then you remove them, save them and reuse them
- Canning Jar funnel - to fill the jars
FREE Illustrated Canning, Freezing, Jam Instructions and Recipes
Don't spend money on books. that you don't need to. Almost everything you can find in some book sold online or in a store is on my website here for free. Start with theEasy Home Canning Directions below. That is a master list of canning directions which are all based upon the Ball Bblue book, the National Center for Home Food Preservation and other reputable lab tested recipes. Almost every recipe I present in addition to being lab tested com. is in a step by step format with photos for each step and complete. explanations. that tell you how to do it, where to get the supplies and pretty much everything you need to know. In addition, there almost always in a PDF format so you can print them out and use them while you cook.
[ Easy Home Canning Directions]
[FAQs - Answers to common questions and problems]
[Recommended books about home canning, jam making, drying and preserving!]


Looking for canning equipment and supplies?
Water bath canner with a jar rack
Pressure canners for gas, electric and induction stoves: Presto 23Qt or T-fal 22Qt
Canning scoop (this one is PERFECT)
Ball Blue book (most recent version)
Find Other types of farms:
- Easter egg hunts
- Children's consignment sales
- Farm markets and roadside stands
- Road trips and camping resources
- Local Honey, apiaries, beekeepers
- Local Meat, Milk and Eggs
- Consumer fraud and scams information
- Home canning supplies at the best prices on the internet!
- Maple Syrup Farms, sugarworks, maple syrup festivals
- Environmental information and resources
- Farms For Your Event for birthday parties, weddings, receptions, business meetings, retreats, etc.
- Festivals - local fruit and vegetable festivals
- Pumpkin patches and corn mazes
- Christmas Tree Farms and lots
Get the
most recent version of
the Ball Blue Book
Get the
most recent version of
the Ball Blue Book of Home Canning
Find other types of farms:
- Easter egg hunts
- Children's consignment sales
- Farm markets and roadside stands
- Local Honey
- Local Meat, Milk and Eggs
- Road trip and camping
- Pumpkin patches and corn mazes
- Christmas Tree Farms and lots
- Maple Syrup farms and sugarworks
Highly rated canning supplies:
- Regular Mouth Canning Lids with food-grade with BPA Free Silicone seals for Ball, Kerr Jars for Canning
- Canning accessories kit: funnel, jar tongs, lid lifter, etc
- Food Dehydrator, 400W Electric with 8 Trays, 48 hour Timer and Temperature Control 95-176℉, BPA-Free
- Water Bath Canner, 21 Qts with lid, Jar Rack, Speckled Black, cans 7 quart jars, 9 pint jars or 13 half-pint jars
- Air Fryer: Instant Pot Instant Vortex Plus XL 8QT Clear Windows, Custom Programming, 8-in-1 Functions that Crisps, Broils, Roasts, Dehydrates, Bakes, Reheats
- Pressure canner: All American 921, 21.5qt Pressure Cooker/Canner, never needs gaskets, Great for Gas, Electric or Flat Top Stoves - Made in the USA
- The Backyard Homestead:a guide to homesteading , on 1/4 acre, how to raise grains and vegetables; raise animals for meat, eggs, and dairy; and keep honey bees
- Smart silent HEPA Air Purifiers for Home, Large Rooms for Allergies, Smoke, Pets. Eliminates 99.97% of Dust, Pet Hair, Odors
