Looking for Watermelon Jelly - Homemade, Easily! With Step-by-step Photos, Recipe, Directions, Ingredients and Costs in 2025? Scroll down this page and follow the links. And if you bring home some fruit or vegetables and want to can, freeze, make jam, salsa or pickles, see this page for simple, reliable, illustrated canning, freezing or preserving directions. There are plenty of other related resources, click on the resources dropdown above. If you are having a hard time finding canning lids, I've used these, and they're a great price & ship in 2 days.
If you have questions or feedback, please let me know! There are affiliate links on this page. Read our disclosure policy to learn more.
Watermelon Jelly - Homemade, Easily! With Step-by-step Photos, Recipe, Directions, Ingredients and Costs
 How to Make Homemade Watermelon Jelly
(and jelly from other types of melons)
Click here for a PDF print version
Making and canning your own watermelon jelly is quite easy. And you'd be surprised just how good it is. Heck, I'm not even a big fan of fresh watermelons, but I love this watermelon jelly, as do my kids. It is incredibly inexpensive to make, too. You can even use the rinds to make pickled sweet melon rinds, which are also good! Here's how to do it, in 10 easy steps and completely illustrated. See this page for pickled watermelon rind. See this page for berry jams, this page for Fig Jam and this page for Blueberry Jam directions!Safety: Is is an unusual recipe; all the recipes I publish come from lab tested sources. This one doesn't. So why would I publish it? Two reasons:
1. Pomona Pectin publishes a recipe that is almost identical and as a anufacturer of food canning pectin, they feel it is safe.
2. This recipe is the same as the lab tested pickled watermelon rind recipe, just pureed the flesh instead, and added a small amount of pectin. And still acidify it in the same way, to the same extent. It should be as safe as the lab tested pickled watermelon rind recipe. But since it has not been specifically tested, I would keep it refrigerated.
This is what the University of Wisconsin Extension Service says on the subject:
Watermelon is an unusual fruit because it is not acidic. Most fruits - peaches, pears, apples, and oranges are good examples - are high in acid, they have a pH of 4.6 or below. Melons (honey dew, watermelon, and cantaloupe) are an exception to this. Melons have an average pH of 6.2, they are low in acid. Because they are low in acid, they can not be safely canned in a boiling water canner unless the product is significantly changed by adding a lot of acid or sugar. The amount of acid added to jams and jellies to help pectin to gel is not enough to ensure the safety of watermelon jelly. And no tests have been done to indicate just how much sugar would be needed for a safe jelly.Notice even they say that it would have to be significantly altered adding a lot of acid or sugar. We add both, in the same proportions as for the lab-tested watermelon rind recipe. However, I will repeat that this is NOT a lab tested recipe, so to be cautious, you may want to store it in the refrigerator, even after canning.
To answer the consumer's question, despite what the internet may say, there are no safe, tested recipes for watermelon jelly.
Ingredients
- 4 cups chopped up watermelon (without the seeds or rind) . That is a full 4 cups, liquid and all, no air spaces.
- 3 1/2 cups sugar
- 1 cup lemon juice
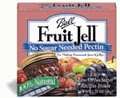
- 1.5 packages of dry no-sugar needed pectin
Equipment
- Jar grabber (to pick up the hot jars)
- Jar funnel ($4 at mall kitchen stores and local "big box" stores, but it's usually cheaper online from our affiliates)
- At least 1 large pot
- Jelly strainer (see step 6) or cheesecloth
- Large spoons and ladles,
- 1 water bath canner (a huge pot with a lifting rack to sanitize the jars of watermelon jelly after filling (about $30 to $35 at mall kitchen stores and local "big box" stores, but it's usually cheaper online from our affiliates) You CAN use a large pot instead, but the canners are deeper, and have a rack top make lifting the jars out easier. If you plan on canning every year, they're worth the investment.
- Vegetable / fruit peeler ($1.99 at the grocery store)
- Canning jars (often called Ball jars, Mason jars or Kerr jars) (Publix, Kroger, other grocery stores and some "big box" stores carry them - now about $12 per dozen quart jars (up 50% in 2 years!) including the lids and rings)
Watermelon / Other Melon Jelly Recipe and Directions
 Step
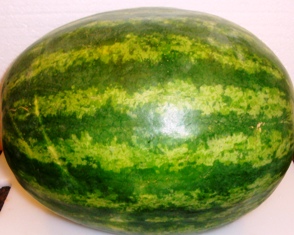
1 - Selecting the watermelons
Step
1 - Selecting the watermelons
The most important step! You need watermelons that are sweet and ripe, but nut overripe and mushy. Any color will work,. You can mix different colors, if you like.
Step 2 -Wash, cut and dice the watermelons!
I'm sure you can figure out how to wash the outside of the watermelons in plain cold water.
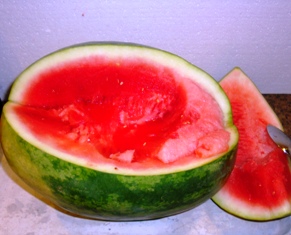 Then,
cut the watermelons open and start scooping out the contents.
Ideally, you make small 1 inch balls, cubes or chunks. Those will
blend up easily in your blender or food processor.
Then,
cut the watermelons open and start scooping out the contents.
Ideally, you make small 1 inch balls, cubes or chunks. Those will
blend up easily in your blender or food processor.
If you do this on a cutting board inside a baking tray. it will help you to collect the liquid to use. The rind may be used in making watermelon rind pickles (see this page, but the seeds are useless, except for planting or spitting at each other.
You will need 4 cups of chopped up watermelon.
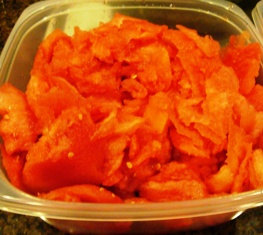
Step 3 -Puree the watermelon!
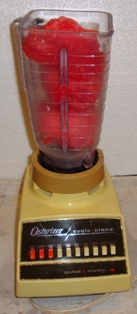 Place
diced watermelon in a blender or food processor.
Place
diced watermelon in a blender or food processor.
Cover and blend or process until smooth.
It should reduce to approximately 2 cups of watermelon puree. That (2 cups after the blender) is the amount you will need for the recipe. Pour it into a large pot.
Step 4 - Add lemon juice
Add the lemon juice to the pot! Do NOT skip lemon juice. It is key to the safety of this recipe, since watermelons are not acidic! It is also important to activate the pectin to set a good gel!
NOTE: if you want to strain the jelly, now's the time to use the strainer or cheesecloth. Personally, I think it's a waste of time. Look at the jar in step 11; it just doesn't need it.
You don't need this for watermelon jelly, unless you want to be sure to remove every seed and bit. For that, it's quite helpful. See here for jelly strainers and jam and jelly-making supplies on Amazon
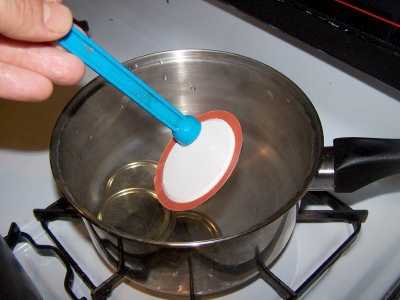
Step 5 - Mix the dry pectin with about 1/4 cup of sugar or other sweetener
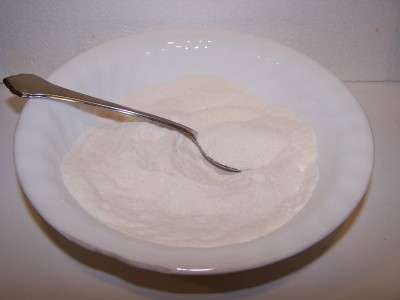 In
a small bowl, mix the dry pectin with about 1/4 cup of sugar (or other
sweetener). Keep this separate from the rest of the sugar. If you are not
using sugar, you will just have to stir more vigorously to prevent the pectin
from clumping.
In
a small bowl, mix the dry pectin with about 1/4 cup of sugar (or other
sweetener). Keep this separate from the rest of the sugar. If you are not
using sugar, you will just have to stir more vigorously to prevent the pectin
from clumping.
Notes about pectin: I usually add about 25% - 30% more pectin (just open another pack and add a little) or else the jam is runnier than I like. With a little practice, you will find out exactly how much pectin to get the thickness you like.
For more about the types of pectin sold,
see this page!
Is your jam too runny? Pectin enables you to turn out perfectly set jam
every time. Made from natural sources (apples and crabapples), there are
also no-sugar pectins that allow you to reduce the sugar you add by almost
half!
Get canning jars, rings, lids and pectin deliverd:
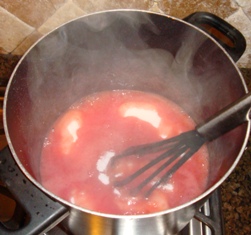
Step 6 - Mix the watermelon juice with the pectin and cook to a full boil
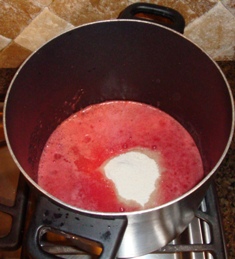 Stir
the pectin into the watermelon juice and put the mix in a big pot on the
stove over medium to high heat (stir often enough to prevent burning).
Stir
the pectin into the watermelon juice and put the mix in a big pot on the
stove over medium to high heat (stir often enough to prevent burning).
It should take about 5 to 10 minutes to get it to a full boil (the kind that cannot be stirred away).
Step 7 - Add the remaining sugar and bring to a boil
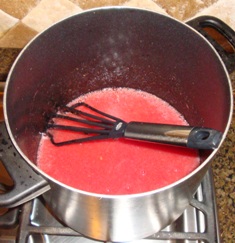 When
the mix has reached a full boil, add the rest of the sugar
(or other sweetener). I recommend using some real sugar or honey, as
jellies made with no added sugar, or just Stevia (in a prepared form like Truvia, it measures same as sugar; if you use another form, you will need do your own conversion) - or Splenda, if you prefer, turn our rather flat tasting and runny.
When
the mix has reached a full boil, add the rest of the sugar
(or other sweetener). I recommend using some real sugar or honey, as
jellies made with no added sugar, or just Stevia (in a prepared form like Truvia, it measures same as sugar; if you use another form, you will need do your own conversion) - or Splenda, if you prefer, turn our rather flat tasting and runny.
After adding the sugar or sugar/sweetener blend, then bring it back to a boil and boil hard for 1 minute. Depending upon which type of jam you're making (sugar, no-sugar, Stevia (but you will have to experiment with amount, each brand of Stevia is a different concentration), or Splenda, or a mix of sugar and Stevia (or Splenda) or fruit juice) you will need to use a different amount of sugar and type of pectin.
The precise measurements are found in directions inside each and every box of pectin sold (every brand, Ball, Kerr, Mrs. Wages, etc. has directions inside). .
Step 8 - Testing for "jell" (thickness)
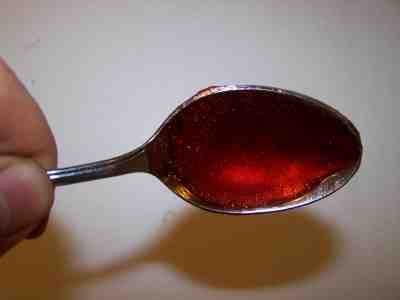 I
keep a metal tablespoon sitting in a glass of ice water, then take a half
spoonful of the mix and let it cool to room temperature on the spoon. If
it thickens up to the consistency I like, then I know the jam is ready. If
not, I mix in a little more pectin (about 1/4 to 1/2 of another package)
and bring it to a boil again for 1 minute.
I
keep a metal tablespoon sitting in a glass of ice water, then take a half
spoonful of the mix and let it cool to room temperature on the spoon. If
it thickens up to the consistency I like, then I know the jam is ready. If
not, I mix in a little more pectin (about 1/4 to 1/2 of another package)
and bring it to a boil again for 1 minute.
Step 9 - Fill the jars and put the lid and rings on
 Fill
them to within 1/2-inch of the top, wipe any spilled jam off the top, seat
the lid and tighten the ring around them. Then put the filled jars into the canner!
Fill
them to within 1/2-inch of the top, wipe any spilled jam off the top, seat
the lid and tighten the ring around them. Then put the filled jars into the canner!
 This
is where the jar tongs and lid lifter come in really handy!
This
is where the jar tongs and lid lifter come in really handy!
Step 10 - Process the jars in the boiling water bath
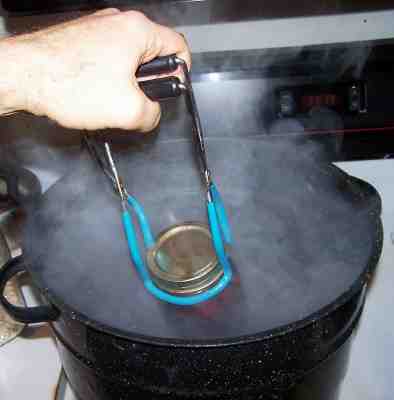 Keep
the jars covered with at least 2 inches of water. Keep the water boiling. In
general, boil them for 10 minutes, which is what SureJell (the makers of the
pectin) recommend. I say "in general" because you have to process
(boil) them longer at higher altitudes than sea level, or if you use larger
jars,
Keep
the jars covered with at least 2 inches of water. Keep the water boiling. In
general, boil them for 10 minutes, which is what SureJell (the makers of the
pectin) recommend. I say "in general" because you have to process
(boil) them longer at higher altitudes than sea level, or if you use larger
jars,
 or
if you did not sanitize the jars and lids right before using them. The
directions inside every box of pectin will tell you exactly. The
directions on the pectin tend to be pretty conservative. Clemson
University says you only need to process them for 5 minutes. I usually
hedge my bets and start pulling them out after 7 minutes, and the last jars
were probably in for 10. I rarely have a jar spoil, so it must work.
or
if you did not sanitize the jars and lids right before using them. The
directions inside every box of pectin will tell you exactly. The
directions on the pectin tend to be pretty conservative. Clemson
University says you only need to process them for 5 minutes. I usually
hedge my bets and start pulling them out after 7 minutes, and the last jars
were probably in for 10. I rarely have a jar spoil, so it must work.
Note: Some people don't even boil the jars; they just ladle it hot into hot jars, put the lids and rings on and invert them, (this is called "open kettle" processing). Open kettle process is universally condemned by all of the authorities (USDA, FDA, Universities - Clemson, UGa, Minnesota, WI, Michigan, etc,.) as being inherently dangerous and conducive to botulism. It does not create a sterile environment; it does create the ideal environment for botulism to grow.
Putting the jars in the boiling water bath REALLY helps to reduce spoilage! To me, it makes little sense to put all the working into making the jam and then not to process the jars to be sure they don't spoil or risk your family's health.!
Step 11 - Remove and cool the jars - Done!
Lift
the jars out of the water and let them cool without touching or bumping
them in a draft-free place (usually takes overnight) You can then remove
the rings if you like, but if you leave them on, at least loosen them
quite a bit, so they don't rust in place due to trapped moisture. Once
the jars are cool, you can check that they are sealed verifying that the
lid has been sucked down. Just press in the center, gently, with your
finger. If it pops up and down (often making a popping sound), it is not
sealed. If you put the jar in the refrigerator right away, you can still
use it. Some people replace the lid and reprocess the jar, then that's a
bit iffy. If you heat the contents back up, re-jar them (with a new lid)
and the full time in the canner, it's usually ok.
Once cooled, they're ready to store. I find they last up to 12 months. But after about 6 to 8 months, they get darker in color and start to get runny. They still are safe to eat, but the flavor and texture aren't as good. So eat them in the first 6 months after you prepare them!
Other Equipment:
From left to right:
- Jar lifting tongs
helpful to pick up hot jars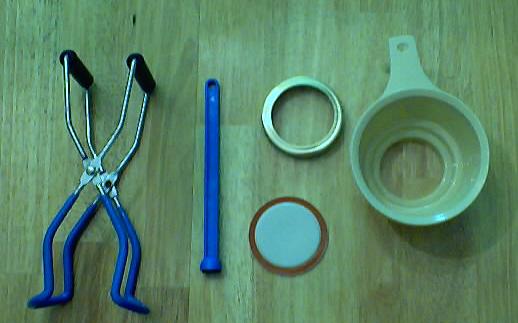
- Lid lifter
- to remove lids from the pot
of hot water - Lids
- disposable - you may only
use them once - Ring
- holds the lids on the jar until after
the jars cool - then you remove them, save them and reuse them - Canning Jar funnel
- to fill the jars


Looking for canning equipment and supplies?
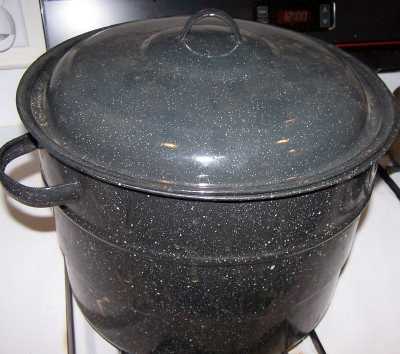
Water bath canner with a jar rack
Pressure canners for gas, electric and induction stoves: Presto 23Qt or T-fal 22Qt
Canning scoop (this one is PERFECT)
Ball Blue book (most recent version)
Jars: 8oz canning jars for jams
Find Other types of farms:
Farm markets and roadside stands
Road trips and camping resources
Local Honey, apiaries, beekeepers
Consumer fraud and scams information
Home canning supplies at the best prices on the internet!
Maple Syrup Farms, sugarworks, maple syrup festivals
Environmental information and resources
Farms For Your Event for birthday parties, weddings, receptions, business meetings, retreats, etc.
Festivals - local fruit and vegetable festivals
Get the
most recent version of
the Ball Blue Book
