Looking for How to Can Fresh Tomatoes with a Water Bath Canner! in 2025? Scroll down this page and follow the links. And if you bring home some fruit or vegetables and want to can, freeze, make jam, salsa or pickles, see this page for simple, reliable, illustrated canning, freezing or preserving directions. There are plenty of other related resources, click on the resources dropdown above. If you are having a hard time finding canning lids, I've used these, and they're a great price & ship in 2 days.
If you have questions or feedback, please let me know! There are affiliate links on this page. Read our disclosure policy to learn more.
How to Can Fresh Tomatoes with a Water Bath Canner!
 How to Can Fresh Tomatoes with a Water Bath Canner!
Click here for a PDF print version
Making canned tomatoes is something families remember years later. Home-canned tomatoes have been a tradition for many generations. In the middle of the winter, you can use the tomatoes to make a fresh spaghetti sauce, lasagna, chili, or other tomato-based meals for that fresh garden taste.
Here's how to do it, in easy steps and completely illustrated. This method is so easy, ANYONE can do this! It's a great thing to do with your kids! Also, this recipe/directions works with either red (ripe) or green (unripe tomatoes).
If you have a Pressure Canner, you may want to see the pressure canning tomatoes page for those directions instead!
And if you'd rather freeze your tomatoes, see this page! These pages may also interest you:
- How to make tomato sauce
- How to make tomato paste
- And if you'd like to start you own tomatoes from seed (you can save a
small fortune and grow the heirloom varieties you like)
see this page for easy directions for growing your own tomato plants from seed.
Ingredients
- Tomatoes - about 20 lbs to make 7 quarts (7 large tomatoes will fill one quart jar.)
- lemon juice - fresh or bottled, about 1/2 cup
- 1 quart tomato juice (or plain water)
Equipment
- 1 water bath canner (a huge pot to sanitize the jars after filling (about $30 to $35 - $30 at mall kitchen stores and local "big box" stores. Note: we sell many sizes and types of canners for all types of stoves and needs - see canning supplies). Tomatoes are on the border between the high-acid fruits that can be preserved in a boiling-water bath and the low-acid fruits, vegetables and meats that need pressure canning
- 1 large pot (to scald the tomatoes, step 3) and 1 medium sized pot to heat the tomato juice or water to add to the jars (step 6) and 1 small pot to sanitize the lids.
- Pint or quart canning jars (Ball or Kerr jars can be found at Publix, Kroger, Safeway and local "big box" stores - about $13 per dozen 8-ounce jars, more for quilted design or larger jars, including the lids and rings). Quart jars are more economical!
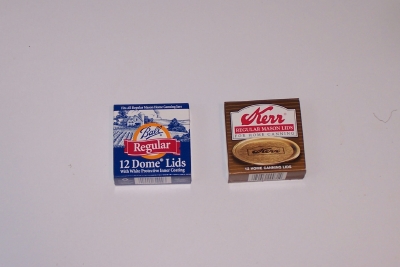
- Lids - thin, flat, round metal lids with a gum binder that seals them against the top of the jar. They may only be used once.
- Rings - metal bands that secure the lids to the jars. They may be reused many times.
- Jar grabber (to pick up the hot jars)
- Lid lifter (has a magnet to pick the lids out of the almost-boiling water where you sanitize them. ($4 at mall kitchen stores and local "big box" stores, but it's usually cheaper online from our affiliates)t)
- Jar funnel ($3-Grocery stores, like Publix, Kroger and Safeway and local "big box" stores; sometimes even hardware stores)
- Large spoons and ladles,
Process - How to Make Home Canned Tomatoes from Fresh Tomatoes
 Step
1 - Selecting the tomatoes
Step
1 - Selecting the tomatoes
It's fun to go pick your own and you can obviously get better quality tomatoes!
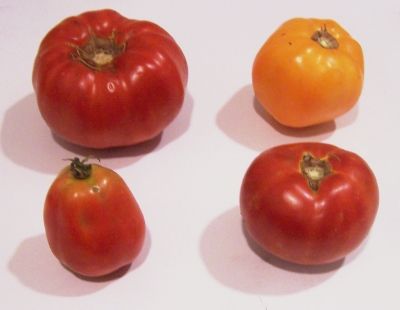
At right is a picture of tomatoes from my garden - they are so much better than anything from the grocery store. And if you don't have enough, a pick-your-own farm is the pace to go! At right are 4 common varieties that will work:
| Top left: Beefsteak | Top right: Lemon Boy, yellow |
| Bottom left: Roma, paste-type | Bottom right: Better Boy |
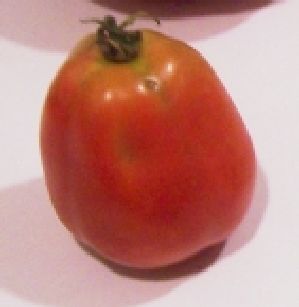 The
picture at right shows the best variety of tomato to use: Roma; also
called paste tomatoes. They have fewer sides, thicker, meatier
walls, and less water.
And that means thicker sauce in less cooking time! You may can cherry
tomatoes, grape tomatoes, etc., but they do tend to be more watery,
and you must be sure to added the lemon juice as recommended in the
recipe, because they tend to be lower in natural acidity.
The
picture at right shows the best variety of tomato to use: Roma; also
called paste tomatoes. They have fewer sides, thicker, meatier
walls, and less water.
And that means thicker sauce in less cooking time! You may can cherry
tomatoes, grape tomatoes, etc., but they do tend to be more watery,
and you must be sure to added the lemon juice as recommended in the
recipe, because they tend to be lower in natural acidity.
Also, you don't want mushy, bruised or rotten tomatoes!
And for those of you with an abundance of green tomatoes, the USDA says that since green tomatoes are more acidic than ripened fruit, they can be canned safely with any of the standard tomato directions. I prefer to store them in the basement, where they slowly ripen, but if you have a use later for canned green tomatoes, go for it..
Step 2 - Get the jars and lids sanitizing
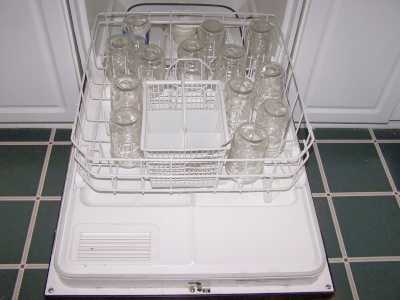 The
dishwasher is fine for the jars; especially if it has a "sanitize" cycle.
I get that going while I'm preparing everything else, so it's done by the
time I'm ready to fill the jars. If you don't have a dishwasher,
submerge the jars in a large pot (the canner itself) of water and bring it
to a boil.
The
dishwasher is fine for the jars; especially if it has a "sanitize" cycle.
I get that going while I'm preparing everything else, so it's done by the
time I'm ready to fill the jars. If you don't have a dishwasher,
submerge the jars in a large pot (the canner itself) of water and bring it
to a boil.
Be sure to let it go through the rinse cycle to get rid of any soap!
Get the canner heating up
 Fill
the canner about 1/2 full of water and start it heating (with the lid on).
Fill
the canner about 1/2 full of water and start it heating (with the lid on).
Get a the medium pot of water or tomato juice heating
This is also a good time to get your 1 quart of tomato juice and/or water boiling (you will use it to fill any air spaces in the jars in step 6).
Start the water for the lids
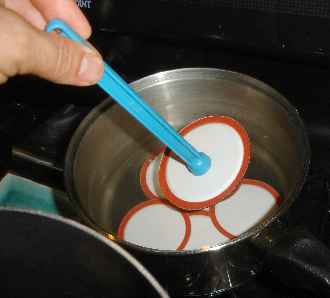
 Put
the lids into a pan of hot, but not quite boiling water for at least several minutes.
Note: everything gets sanitized in the water bath (step 7) anyway, so this just
helps to ensure there is no spoilage later!)
Put
the lids into a pan of hot, but not quite boiling water for at least several minutes.
Note: everything gets sanitized in the water bath (step 7) anyway, so this just
helps to ensure there is no spoilage later!)
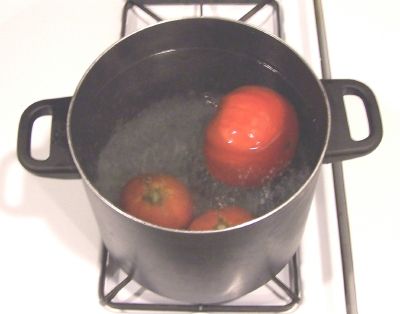
Step 3 - Removing the tomato skins
Here's a trick you may not know: put the tomatoes, a few at a time in a large pot of boiling water for no more than 1 minute (30 - 45 seconds is usually enough)
then....
Plunge them into a waiting bowl of ice water.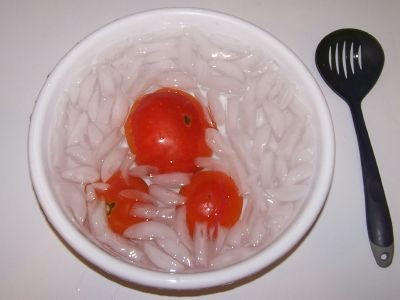
This makes the skins slide right off of the tomatoes! If you leave the skins in, they become tough and chewy in the sauce, not very pleasant.
Step 4 - Removing the skins, bruises and tough parts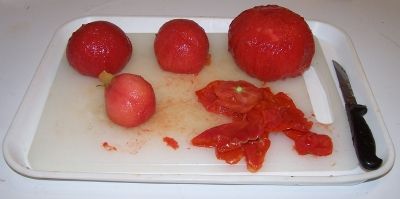
The skins should practically slide off the tomatoes. then you can cut the tomatoes in quarters and remove the tough part around the stem and any bruised or soft parts.
Step 5 - Fill the jars with the whole or cut tomatoes
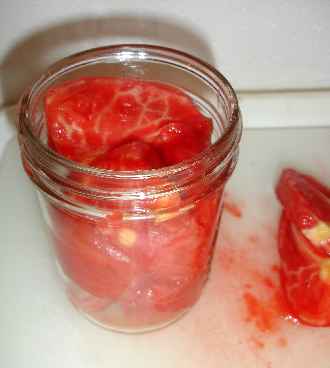 Fill
them to within 1/4-inch of the top with tomatoes
Fill
them to within 1/4-inch of the top with tomatoes
Be sure the contact surfaces (top of the jar and underside of the ring) are clean to get a good seal!
Step 6 - Add 2 Tablespoons of lemon juice and liquid
 After
you fill each jar with tomatoes, add 2 tablespoons of lemon juice per quart jar,
1 per pint jar. This helps to reduce the odds of spoilage and to retain
color and flavor. Then fill to 1/2 inch of the top with either boiling water or
hot tomato juice.
After
you fill each jar with tomatoes, add 2 tablespoons of lemon juice per quart jar,
1 per pint jar. This helps to reduce the odds of spoilage and to retain
color and flavor. Then fill to 1/2 inch of the top with either boiling water or
hot tomato juice.
Step 7 - Free any trapped air bubbles
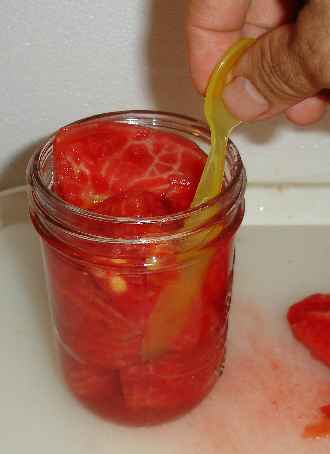 Using
a flat plastic or wood utensil (like a plastic spoon, up side down) free trapped
air bubbles by gently sliding it up and down around the inside edge.
Using
a flat plastic or wood utensil (like a plastic spoon, up side down) free trapped
air bubbles by gently sliding it up and down around the inside edge.
Step 8 - Put the lids and rings on
Just
screw them on snugly, not too tight. If the is any tomato on the surface
of the lip of the jar, wipe it off first with a clean dry cloth or paper towel.
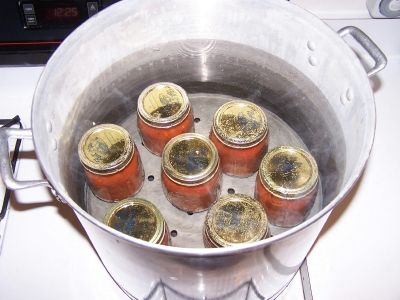 Step
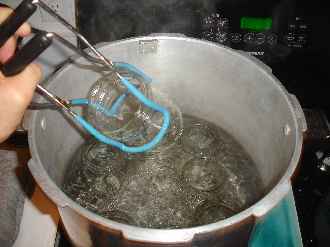
9 - Boil the jars in the water bath canner
Step
9 - Boil the jars in the water bath canner
Put them in the canner and keep them covered with at least 1 inch of water. Keep the water boiling. Process the jars in a boiling-water bath for 40 minutes for pints and 45 minutes for quarts. Remember to adjust the time if you are at a different altitude other than sea level! Pressure canners work better for tomatoes and other low acid foods - you will get less spoilage with a Pressure Canner.
I prefer a Pressure Canner as the higher temperatures and shorter cooking time result in better flavor and less spoilage. For more information or to order one, click on Pressure Canners. The recipe and directions for pressure canning tomatoes are here.
|
Recommended process time for Crushed Tomatoes in a boiling-water canner. |
|||||
| Process Time at Altitudes of | |||||
| Style of Pack | Jar Size | 0 - 1,000 ft | 1,001 - 3,000 ft | 3,001 - 6,000 ft | Above 6,000 ft |
| Hot | Pints | 35 min | 40 | 45 | 50 |
| Quarts | 45 | 50 | 55 | 60 | |
Step 10 - Done
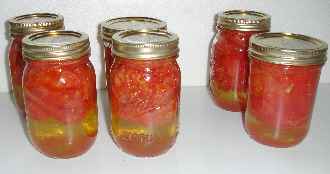 Lift
the jars out of the water and let them cool without touching or bumping
them in a draft-free place (usually takes overnight) You can then
remove the rings if you like, but if you leave them on, at least loosen
them quite a bit, so they don't rust in place due to trapped moisture.
Once the jars are cool, you can check that they are sealed verifying
that the lid has been sucked down. Just press in the center, gently,
with your finger. If it pops up and down (often making a popping sound),
it is not sealed. If you put the jar in the refrigerator right away, you
can still use it. Some people replace the lid and reprocess the jar,
then that's a bit iffy. If you heat the contents back up, re-jar them
(with a new lid) and the full time in the canner, it's usually ok.
Don't worry if you see the tomatoes floating above a layer of liquid;
that's normal. tomatoes have a lot of water in them and it
separates a bit. If I had packed the tomatoes in the jars a bit
tighter or squeezed for of the free liquid out of them before packing
them in the jars, the water layer would be reduced.
Lift
the jars out of the water and let them cool without touching or bumping
them in a draft-free place (usually takes overnight) You can then
remove the rings if you like, but if you leave them on, at least loosen
them quite a bit, so they don't rust in place due to trapped moisture.
Once the jars are cool, you can check that they are sealed verifying
that the lid has been sucked down. Just press in the center, gently,
with your finger. If it pops up and down (often making a popping sound),
it is not sealed. If you put the jar in the refrigerator right away, you
can still use it. Some people replace the lid and reprocess the jar,
then that's a bit iffy. If you heat the contents back up, re-jar them
(with a new lid) and the full time in the canner, it's usually ok.
Don't worry if you see the tomatoes floating above a layer of liquid;
that's normal. tomatoes have a lot of water in them and it
separates a bit. If I had packed the tomatoes in the jars a bit
tighter or squeezed for of the free liquid out of them before packing
them in the jars, the water layer would be reduced.
Frequently Asked Questions about Canning Tomatoes
Why do my tomatoes separate from the liquid?
A frequent problem is the separation of water from the tomatoes. Why does the water separate from the solids in tomatoes?
Scenario 1 - liquid at the top and solids at the bottom
Home canned tomatoes, tomato juice, and tomato sauces with liquid at the top and solids at the bottom is quite normal. It only reflects that the juice was made prior to heating. For example, the tomatoes were chopped, run through the steamer, sieve, or food mill while still raw and prior to heating.
As soon as they are chopped or crushed, enzymes start to break down the pectin that helps to hold tomato cells together. The enzyme that causes separation is activated by exposure to air and inactivated by heat. In commercial production, tomatoes are flash heated nearly to boiling in a matter of seconds, using equipment not available to consumers. Because the pectin holding tomato cells together is not exposed to air when cold, it remains intact, and a thick bodied, homogeneous juice is produced.
The solution is to leave tomatoes whole or in large chunks (do not chop). Heat before chopping or juicing to minimize the separation.
The best way to do that at home is to heat quartered tomatoes quickly to boiling temperatures WHILE crushing. You can also heat the blanched, peeled whole tomatoes in the microwave, then crush them!
Make sure the mixture boils constantly and vigorously while you add the remaining tomatoes. Simmer 5 minutes after all tomatoes are added, before juicing. If you are not concerned about juice separating, simply slice or quarter tomatoes into a large saucepan. Crush, heat and simmer for 5 minutes before juicing.
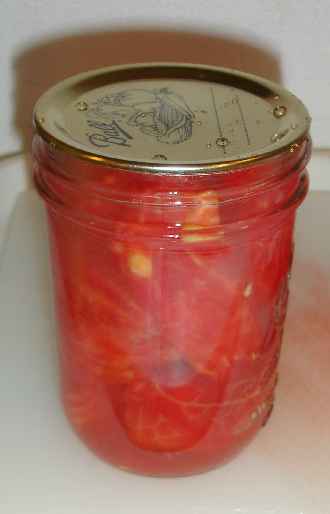
Scenario 2 - liquid at the bottom and solids at the top (note the photo is step 10)
What about the reverse: liquid at the bottom and solids at the top? That indicates too much preheating (more than 5 minutes). Pectin breaks down when it is overheated; then separation results. If separation occurs, just shake the jar before opening or decant the water off.
References: Ohio State University
I recently canned tomatoes but had one little jar that I didn't have room for in the water bath. So I decided to just refrigerate it. All I've done to those tomatoes is blanch them -- haven't cooked them, stewed them, done anything else. There is some lemon juice in them. They've been refrigerated since I packed them -- how long will they be okay to use?
They will last about the same length of time that a can of tomatoes from the grocery store will last once you open it an put it in the fridge. I'd guess a couple of weeks, but that depends on how cold your fridge is.
After I removed the jars of tomatoes from the canner, the jars had lost a lot of liquid and were about half-empty. What happened? Are they safe?
There are several possible causes:
- The food was not heated prior to filling (Raw pack method) -
- The food was packed too tightly (or loosely) in the jars
- All air bubbles were not removed prior to sealing the lids and rings on the jars
- The jars were not completely covered with water (applies to a water bath canner only)
- Starchy foods, such as corn, peas or lima beans, absorbed all the liquid. Use more liquid with these starchy vegetables.
- The jars were filled too full.
- Fluctuating pressure in the pressure canner. Let pressure return to zero gradually, avoiding the sudden release of pressure through the vent. Do not hasten the cooling with cold water.
As long as the jars remained sealed, they will be ok, but they should be checked more frequently and used up first!
What did I do wrong if my jars spoil?
Tomatoes are a borderline acid / low acid fruit (see this page about tomato acidity for more information) - adding lemon juice helps, processing at least 35 minutes in the water bath canner, or better still, using a Pressure Canner almost eliminates spoilage. If you don't have a pressure canner, you must boost the acid level of the sauce, by adding 2 tablespoons of lemon juice or 1/2 teaspoon of citric acid per quart of sauce.
Other Equipment:
|
From left to right:
|
Canning kit with Stainless Steel Steam Rack,Canning Funnel, Jar Lifter, Jar Wrench, Lid Lifter, Canning Tongs, Bubble Remover Tool |
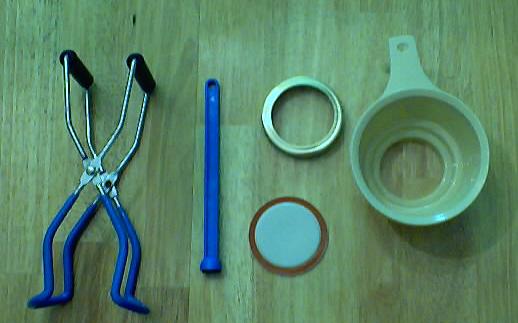 |
Home Canning KitsThis is the same type of standard canner that my grandmother used
to make everything from applesauce to jams and jellies to tomato and
spaghetti sauce. This complete kit includes everything you need and lasts
for years: the canner, jar rack, Jar grabber tongs, lid lifting wand, a
plastic funnel, labels, bubble freer, and the bible of canning, the Ball
Blue Book. It's much cheaper than buying the items separately. You will never need anything else except jars & lids! To see more canners, of different styles, makes and prices, click here! |

Summary - Cost of Making Homemade Canned Tomatoes - makes 7 quart jars, 32 oz each* |
||||
| Item | Quantity | Cost in 2025 | Source | Subtotal |
| Tomatoes | 20 - 25 lbs (to make about 16 cups of prepared tomato) | free from the garden, or $0.75 cents at a PYO | Garden | $0.00 |
| Canning jars (quart size, wide mouth), includes lids and rings | 7 jars | $8.00/dozen | Grocery stores, like Publix, Kroger and Safeway and local "big box" stores; sometimes Big Lots and even hardware stores | $4.50 |
| Lemon juice | 14 Tablespoons | $0.50 | Grocery store | $0.50 |
| Total | $5.00 total or about $0.72 per jar INCLUDING the jars - which you can reuse! |
|||
| * - This assumes you already have the pots, pans, ladles,, and reusable equipment. Note that you can reuse the jars! Many products are sold in jars that will take the lids and rings for canning. For example, Classico Spaghetti sauce is in quart sized jars that work with Ball and Kerr lids and rings. Note that the Classico's manufacturer does not recommend reuse of their jars: see what they have to say on this page. | ||||


Looking for canning equipment and supplies?
Water bath canner with a jar rack
Pressure canners for gas, electric and induction stoves: Presto 23Qt or T-fal 22Qt
Canning scoop (this one is PERFECT)
Ball Blue book (most recent version)
Jars: 8oz canning jars for jams
Find Other types of farms:
Farm markets and roadside stands
Road trips and camping resources
Local Honey, apiaries, beekeepers
Consumer fraud and scams information
Home canning supplies at the best prices on the internet!
Maple Syrup Farms, sugarworks, maple syrup festivals
Environmental information and resources
Farms For Your Event for birthday parties, weddings, receptions, business meetings, retreats, etc.
Festivals - local fruit and vegetable festivals
Get the
most recent version of
the Ball Blue Book
