
Looking for How to cook a fresh pumpkin toi use in pies and other recipes! In easy illustrated steps! in 2025? Scroll down this page and follow the links. And if you bring home some fruit or vegetables and want to can, freeze, make jam, salsa or pickles, see this page for simple, reliable, illustrated canning, freezing or preserving directions. There are plenty of other related resources, click on the resources dropdown above. If you are having a hard time finding canning lids, I've used these, and they're a great price & ship in 2 days.
If you have questions or feedback, please let me know! There are affiliate links on this page. Read our disclosure policy to learn more.
How to cook a fresh pumpkin toi use in pies and other recipes! In easy illustrated steps!
How to Cook a Pumpkin to have Pumpkin Puree to Make Pumpkin Recipes!
Click here for a PDF print version
You probably take canned pumpkin for granted. You're there, the can is there, there's a pumpkin on the label... open it and mix it up with spices to make a pie, right. Ah, but a pumpkin pie, pumpkin soup, pumpkin bread made from a fresh pumpkin tastes so much better than the glop that was processed last year! Here's how to do it, complete instructions in easy steps and completely illustrated. And it is much easier than you think, using my "patented" tips and tricks! You can freeze it for later use, too. Note: If you want to can the cooked pumpkin: see this page!
Pumpkin Puree Ingredients and Equipment
Ingredients
- a pie pumpkin (see step 1)
Equipment
- A sharp, large serrated knife
- an ice cream scoop
- a large microwaveable bowl or large pot
Recipe and Directions
Step 1 - Get your pie pumpkin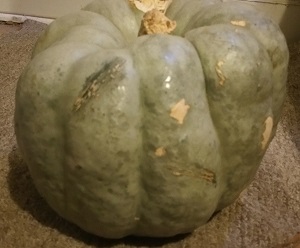
 "Pie
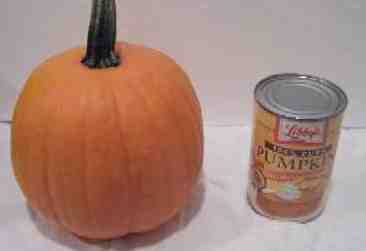
pumpkins" are smaller, sweeter, less grainy textured pumpkins than the
usual jack-o-lantern types. Grocery stores usually carry them in
late September through December in the U.S. Note: the Libby's
can of cooked pumpkin is just there for reference - it is the small can,
so that gives you an idea of the size of a typical pie pumpkin.
They're only about 8 inches in diameter.
"Pie
pumpkins" are smaller, sweeter, less grainy textured pumpkins than the
usual jack-o-lantern types. Grocery stores usually carry them in
late September through December in the U.S. Note: the Libby's
can of cooked pumpkin is just there for reference - it is the small can,
so that gives you an idea of the size of a typical pie pumpkin.
They're only about 8 inches in diameter.
Just like selecting any squash, look for one that is firm, no bruises or soft spots, and a good orange color.
Yield: Pie pumpkins are small, usually only 6 inches in diameter. You can usually obtain about 2 or 3 cups or puree per pumpkin.
If you can get them, jarradale pumpkins (the gray, ribbed pumpkin shown at right), make the best pumpkin pies. They are sweeter, more flavorful, and their flesh is less grainy and drier. Other good choices are butternut squash, Neck pumpkins, and many heirloom pumpkins.
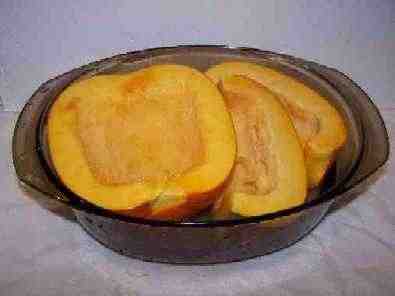
 Step 2 - Prepare the pumpkin for cooking
Wash the exterior of the pumpkin in cool or warm water, no soap.
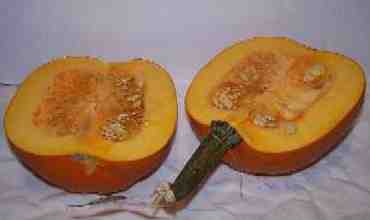
Cut the pumpkin in half. A serrated knife and a sawing motion works best - a smooth knife is more likely to slip and hurt you!
Step 3 - Scoop out the seeds...
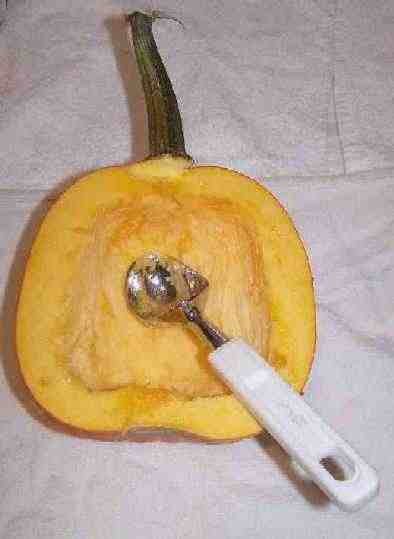 And
scrape the insides. You want to get out that stringy, dangly stuff
that coats the inside surface. I find a heavy ice cream scoop works
great for this.
And
scrape the insides. You want to get out that stringy, dangly stuff
that coats the inside surface. I find a heavy ice cream scoop works
great for this.
Note: SAVE THE SEEDS:
The seeds can be used either to plant pumpkins next year, or roasted to eat this year! Place them in a bowl of water and rub them between your hands. then pick out the orange buts (throw that away) and drain off the water. Spread them out on a clean towel or paper towel to dry and they're ready to save for next year's planting or roast. Click here for roasting instructions! (opens in a new window)
Step 4 - Cooking the pumpkin
There are several ways to cook the pumpkin; just choose use your preferred method. Most people have microwaves, and the use the least energy, so I'll describe that here. But others make good arguments in favor of using a pressure cooker, steaming on the stovetop or baking in the oven. I'll describe microwaving here, and at the end of this document, I've included alternative instructions to replace step 4, if you'd rather use a different method.Put it in a microwaveable bowl
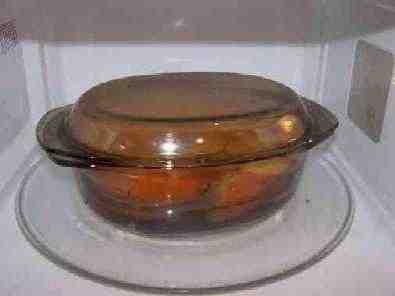
 Remove
the stem, and put the pumpkin into a microwaveable. You may need to cut
the pumpkin further to make it fit. The fewer the number of pieces,
the easier it will to scoop out the cooked pumpkin afterwards.
Remove
the stem, and put the pumpkin into a microwaveable. You may need to cut
the pumpkin further to make it fit. The fewer the number of pieces,
the easier it will to scoop out the cooked pumpkin afterwards.
Put a couple of inches of water in the bowl, cover it, and put in the microwave.
Step 5 - Cook the pumpkin until soft
 Cook
for 15 minutes on high, check to see if it is soft, then repeat in smaller
increments of time until it is soft enough to scoop the innards out.
Normally it takes 20 or 30 minutes in total.
Cook
for 15 minutes on high, check to see if it is soft, then repeat in smaller
increments of time until it is soft enough to scoop the innards out.
Normally it takes 20 or 30 minutes in total.
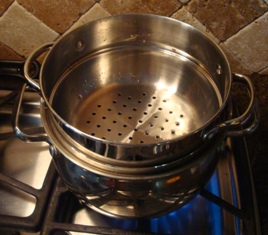
Note: You can also cook it on the stovetop; it takes about the same length of time in a steamer. I use a double pot steamer, but you could use an ordinary large pot with a steamer basket inside it!:

Step 6 - Scoop out the cooked pumpkin
Whether you cook the pumpkin on the stove, microwave, or even the
oven, once it is cooked until it is soft, it is easy to scoop out the
guts with a broad, smooth spoon, (such as a tablespoon). Use the
spoon to gently lift and scoop the cooked pumpkin out of the skin.
It should separate easily an in fairly large chucks, if the pumpkin is
cooked enough.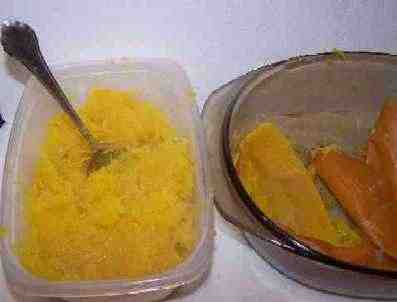
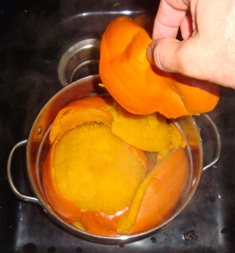 Many
times the skin or rind will simply lift off with your fingers (see the
photo at left) . I'll bet you didn't realize making your own
pumpkin glop... err, "puree" was this easy!
Many
times the skin or rind will simply lift off with your fingers (see the
photo at left) . I'll bet you didn't realize making your own
pumpkin glop... err, "puree" was this easy!
Note: there are many varieties of pumpkin and some make better pies that other (due to sugar content, flavor, texture and water content. Drier, sweeter, fine-grained pies; the small (8" across) ones called "pie pumpkins" are best. If your pumpkin is more watery than the puree in the photo at right (there should not be any free water), you may want to let it sit for 30 minutes and then pour off any free water. That will help prevent your pie from being too watery!
Tip from a visitor: "I make my own pumkin pies from scratch all the time. To eliminate watery pumpkin I strain my pureed pumpkin through a cloth overnight. If I use frozen pumpkin I do the same again as it thaws out. It works great and my pies cook beautifully."
Step 7 - Puree the pumpkin
 To
get a nice, smooth consistency, I use a Pillsbury hand blender. A
regular blender works, too (unless you made a few frozen daiquiris and
drank them first..). Or even just a hand mixer with time and patience.
To
get a nice, smooth consistency, I use a Pillsbury hand blender. A
regular blender works, too (unless you made a few frozen daiquiris and
drank them first..). Or even just a hand mixer with time and patience.
With the hand blender, it just takes 2 or 3 minutes!
Step 8 - Done with the pumpkin!
The pumpkin is no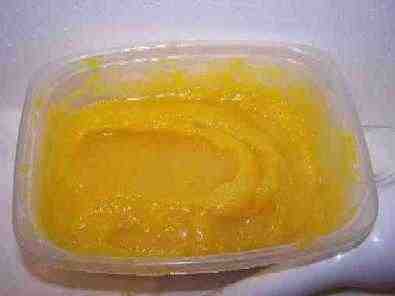 w
cooked and ready for the pie recipe. Get the frozen daiquiris out
from step 7 and take a break! :)
w
cooked and ready for the pie recipe. Get the frozen daiquiris out
from step 7 and take a break! :)
It's ready to pop in the fridge or freezer (just pack it containers, like Ziploc bags or plastic containers, exclude as much air as you can, and freeze it!)
It is not suitable for home canning - See this page for the safety reasons why.
Start making tasty treats!
how about ...
-
How to make a pumpkin pie and How to make a flakey pie crust
-
How to make Pumpkin Bread
-
How to make pumpkin soup
-
How to make roasted pumpkin seeds
Alternative Cooking methods for step 4
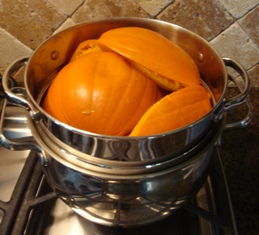
If you don't have a microwave, or prefer another method, try these:Stovetop steaming - Place your steaming basket or grid in the bottom of a large pot. Put enough water so it won't boil dry in 20 minutes, and yet is not so high that the pumpkin is touching the water level. You may need to add more water during the cooking. Add the pumpkin prepared in step 3, and get the steamer going. The cooking time is only between 8 and 12 minutes, depending on the range (gas or electric), and the pumpkin literally falls off the skin.
Pressure cooker - Place your grid in the bottom of the pressure cooker. If your pressure cooker came with directions, follow those for pumpkin and/or winter squash, like butternut squash. If, like most people, you've long since lost the directions, try this: Add enough water to just touch the bottom of the grid or shelf that you will place the pumpkin on. Add the pumpkin prepared in step 3, put the lid with the gasket, the weight and anything else your cooker requires in place, and turn the heat on high. Once it starts hissing, turn it to medium or medium high. The cooking time should only be about 10 minutes, and the pumpkin should literally fall out of its skin.
Oven - You can also bake the prepared pumpkin in the oven, just like a butternut squash. This method takes the longest. Just put the prepared pumpkin in an ovenproof container (with a lid), add about 3 cups of water to help prevent it from drying out and pop it in an 350 F (200 C) oven. It normally takes about 45 minutes to an hour; just test it periodically by sticking it with a fork to see if it is soft!Feedback
Comments from a visitor on October 11, 2008: "I've always wanted to try cooking with actual pumpkins as opposed to the canned stuff. I did so today. It was a lot of work, granted, but everything I have made so far has been outstandingly delicious. Thank you for your tips, directions, guidance, and recipes! My freezer is full of pumpkin puree that's waiting for me to find another delicious pumpkin recipe!"
| See here for related tools, equipment, supplies on Amazon See here for related tools, equipment, supplies on Amazon |
Complete Water Bath Canner KitThis is the same type of standard canner that my grandmother used
to make everything from pumpkinauce to jams and jellies to tomato and
spaghetti sauce!. This complete kit includes everything you need: the
canner, jar rack, Jar grabber tongs, lid lifting wand, six pint jars with
lids and rings, a plastic funnel, labels, bubble freer, and the bible of
canning, the Ball Blue Book. You will never need anything else except more
jars and lids! |
||
|
|
|
|
|
|
Lids, Rings, Jars, mixes, pectin, etc.Need lids, rings and replacement jars? Or pectin to make jam, spaghetti sauce or salsa mix or pickle mixes? Get them all here, and usually at lower prices than your local store! |


Can't find the equipment? We ship to all 50 states! Just email us!


Looking for canning equipment and supplies?
Water bath canner with a jar rack
Pressure canners for gas, electric and induction stoves: Presto 23Qt or T-fal 22Qt
Canning scoop (this one is PERFECT)
Ball Blue book (most recent version)
Jars: 8oz canning jars for jams
Find Other types of farms:
Farm markets and roadside stands
Road trips and camping resources
Local Honey, apiaries, beekeepers
Consumer fraud and scams information
Home canning supplies at the best prices on the internet!
Maple Syrup Farms, sugarworks, maple syrup festivals
Environmental information and resources
Farms For Your Event for birthday parties, weddings, receptions, business meetings, retreats, etc.
Festivals - local fruit and vegetable festivals
Get the
most recent version of
the Ball Blue Book
