
Looking for How to make a easy, flakey pie crust! (directions, recipe, with photos and free) in 2025? Scroll down this page and follow the links. And if you bring home some fruit or vegetables and want to can, freeze, make jam, salsa or pickles, see this page for simple, reliable, illustrated canning, freezing or preserving directions. There are plenty of other related resources, click on the resources dropdown above. If you are having a hard time finding canning lids, I've used these, and they're a great price & ship in 2 days.
If you have questions or feedback, please let me know! There are affiliate links on this page. Read our disclosure policy to learn more.
How to make a easy, flakey pie crust! (directions, recipe, with photos and free)
Yes, I know there are ready made pie crusts in the frozen section at the store, but they really are bland and doughy. A flaky crust is easy to make, just follow these simple, illustrated instructions! This recipe is almost identical to the pie pastry shell recipes that you will find in many cookbooks, from Betty Crocker, Better Homes and Gardens to the Amish / Mennonite cookbooks. A few variations and tips from Alto brown and others are included. I'm always open to improvements, so please write if you have any suggestions!Directions for Making a Flakey Pie Crust - Easily!
Yield: makes 1 deep dish 10" pie shell. If you are making a double crust pie (a pie with dough on the top, too), simply double it.
Ingredients
- 1.5 cups flour (about 6 ounces by weight) - plain flour, not self-rising. I use whole wheat flour, fresh ground at the store while I wait.
- 2 tablespoons sugar
- 1/2 teaspoon salt (optional)
- 1/6 cup (1 ounce by weight) COLD vegetable shortening - I use coconut oil (my grandmother used "Crisco" - but that is a saturated, hydrogenated trans fat - terrible for heart health!) Some people use animal lard; which doctors also say is a saturated animal fat and therefore bad for heart health) Here's a useful conversion: 1/6 cup = 2 tablespoons + 2 teaspoons
- 1/3 cup COLD butter
- 1/4 cup cold water
Equipment
- Bowls
-
Food processor [it is very helpful, but you can blend by hand]
Recipe and Directions
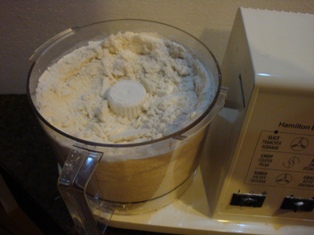
Step 1 - Mix the ingredients
Mix the flour, sugar and shortening first. About 15 seconds in a food processor is by far the best way, since it is fast and the ingredients don't warm up much. Don't make it too smooth or uniform. Little pea sized granules makes a flaky crust.
Note: Alton Brown on the Food Network suggests using 1/6 cup vegetable shortening and 1/3 cup butter (for a total 1/2 cup of both together); because they will melt at different temperatures. It makes a a lighter, flakier crust. Another key is to keep all the ingredients, especially the butter, shortening and water are very cold.
A visitor suggests substituting coconut oil for the Cisco vegetable shortening. She says she used "3 tbs. (1/6 c.) coconut oil and 1/3 c. butter and the crust turned out flaky and fabulous!"
Step 2 - Mix and add water as needed
Then sprinkle in the water, just enough water to make it hold together; a good dough consistency. A pastry blender (see photo) works very well to mix, but some people prefer a few seconds in a food processor instead. Just mix it enough to make it into pieces that hold together about the size of a pea. We don't want to overmix it!
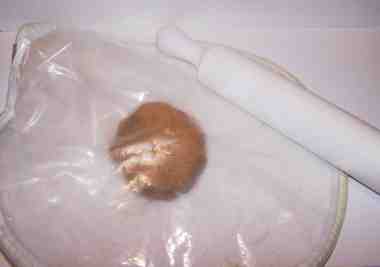
Chill?
If you have time, put the dough (wrapped in plastic wrap or a ziploc bag) into the fridge to rest and chill for a half hour or more. If you don't have time, don't worry, just move on to step 3.
Step 3 - Roll out the dough
I use a pie crust bag (a circular plastic bag that zips up around the edge, but two pieces of waxed paper will work). A couple of tablespoons of flour shaken in the bag will help to keep the dough from sticking to the bag.
If you would like one of these bags, you can order them online below for less than $5 (and a few cents of the order goes to keeping this website going!)
See here for related tools, equipment, supplies on Amazon
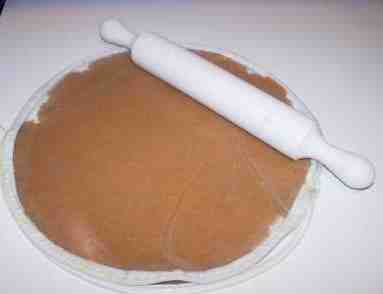
Roll it out to an even thickness, and just an inch or two wider than your pie pan. My crusts are about 1/8 inch thick.
Step 4 - Put in the pie pan and shape!
Place the dough into the pie pan. Don't worry if it breaks.
You can easily fix that.
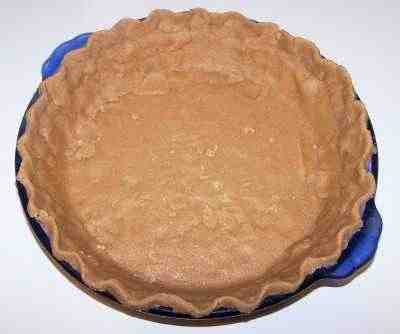 Press
the dough into the pan, seal any broken areas, and shape the top
edge in any pattern you like; just for appearance's sake.
Press
the dough into the pan, seal any broken areas, and shape the top
edge in any pattern you like; just for appearance's sake.
It's now read for you to add the pie ingredients and pop in the oven!
And these pie crust shields prevent the crusts from burning. This oven-safe silicone one is some much better than the old aluminum ones (but I have that one, too, if you prefer it.). The pie weights are very useful, too, for prebaked crusts!
See here for related tools, equipment, supplies on Amazon
See here for related tools, equipment, supplies on Amazon
See here for related tools, equipment, supplies on Amazon


Looking for canning equipment and supplies?
Water bath canner with a jar rack
Pressure canners for gas, electric and induction stoves: Presto 23Qt or T-fal 22Qt
Canning scoop (this one is PERFECT)
Ball Blue book (most recent version)
Jars: 8oz canning jars for jams
Find Other types of farms:
Farm markets and roadside stands
Road trips and camping resources
Local Honey, apiaries, beekeepers
Consumer fraud and scams information
Home canning supplies at the best prices on the internet!
Maple Syrup Farms, sugarworks, maple syrup festivals
Environmental information and resources
Farms For Your Event for birthday parties, weddings, receptions, business meetings, retreats, etc.
Festivals - local fruit and vegetable festivals
Get the
most recent version of
the Ball Blue Book
