
Canning Ketchup: How to Make Homemade Ketchup from Fresh Tomatoes - Easily! With Step-by-step Photos, Recipe, Directions, Ingredients and Costs
Canning Ketchup: Making and Canning Homemade Ketchup from Fresh Tomatoes!
Click here for a printable PDF version!
We take ketchup (or catsup, if you prefer) for granted - it is everywhere and Americans use it in almost everything. Some even put it on scrambled eggs. So maybe you wondered if homemade ketchup taste any different or better? And if you have a mountain of homegrown tomatoes that are going to waste, here's your chance to make your own ketchup and customize to your own taste! Need a low-salt diet? Skip the salt! Want a low or no sugar ketch? You can skip the sugar! Want a spicy ketchup? Add some Tabasco or chilies. Making and canning your own ketchup is something families remember years later. No store bought ketchup compares with the taste of that made from your own tomatoes from your garden or fresh-picked from a local farm! In the middle of the winter, you can pour the ketchup on your food and taste the summer flavor of fresh tomatoes.
Here's how to do it, in easy steps and completely illustrated. This method is easy, ANYONE can do this; but it IS time consuming - I will warn you of that! And it is more complicated than spaghetti sauce, so I'd recommend trying that first. Using a crockpot to cook the tomatoes down really helps save time, though!! It's a great thing to do with your kids!
Note: I've modified this recipe to tone down the spice, so it gives it a more tomato-ey flavor. If you want the spicier recipe, click here!
If you want an easier version of this recipe - almost identical ingredients, just different preparation, see this page for ketchup using your blender.
You may also be interested in How to make cucumber pickle relish! This is the classic hamburger relish!
Ingredients
Yield: 6 to 7 pints
- Tomatoes - about 25 lbs (yes, you need a big basketful - you remove the skins, seeds and a lot of the water, and then cook it down, so it takes a lot to start - UNLESS you are using a paste-type tomato (like Roma) that has little water - you can get by with 18 lbs of those.) You can halve or double this recipe, as needed, to match the am,ount of tomatoes (and time) you have!
- 3 cups of 5% apple cider vinegar.
- Your own seasonings. I haven't seen any ketchup mixes in the stores,
but the seasonings are common, anyway. See below for seasonings.
1 cup chopped onions
1 teaspoon salt (optional - I don't put any in!)
1 cloves of garlic, minced
1 teaspoon black pepper
1/2 teaspoon cayenne pepper
1 cup sugar (white or brown) (Diabetics: yes, you could use Stevia, Splenda, Agave, Honey, or no sugar - it isn't used here as a preservative, just flavoring, to taste!)
Equipment
- 1 water bath canner (a huge pot to sanitize the jars after filling (about $30 to $35 - $30 at mall kitchen stores and local "big box" stores. Note: we sell many sizes and types of canners for all types of stoves and needs - see canning supplies Tomatoes are on the border between the high-acid fruits that can be preserved in a boiling-water bath and the low-acid fruits, vegetables and meats that need pressure canning. I have a pressure canner, so I use that just to make sure there's less spoilage, but a water bath canner will work.
- Food mill or sieve - I highly recommend the Foley Food Mill - it's only about $25. You can use an ordinary sieve, but it will take much longer.
- Pint or half-pint canning jars (Ball or Kerr jars can be found at Publix, Kroger, Safeway and local "big box" stores - about $13 per dozen 8-ounce jars, more for quilted design or larger jars, including the lids and rings).
- Lids - thin, flat, round metal lids with a gum binder that seals them against the top of the jar. They may only be used once.
- Rings - metal bands that secure the lids to the jars. They may be reused many times.
- Jar grabber (to pick up the hot jars)
- Lid lifter (I like the lid rack that holds 12 lids or you can pull them out one at a time with the lid-lifter that has a magnet from the almost-boiling water where you sanitize them. ($4 at mall kitchen stores and local "big box" stores, but it's usually cheaper online from our affiliates)
- 1 large pot.
- 1 saucepan
- Large spoons and ladles,
- Jar funnel ($3-Grocery stores, like Publix, Kroger and Safeway and local "big box" stores; sometimes even hardware stores)
Recipe and Directions - How to Make Ketchup (or Catsup) from Fresh Tomatoes
Step 1 - Selecting the tomatoes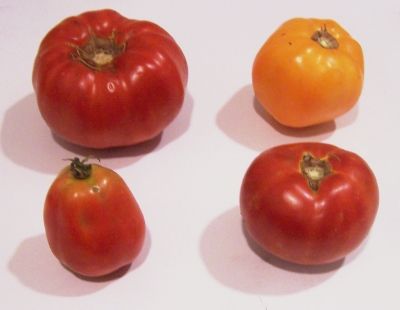
It's fun to go pick your own and you can obviously get better quality tomatoes! 25 pounds is a huge amount of tomatoes. Converted to prepared tomatoes (peeled, chopped, etc.) that's about 16 quarts or 4 gallons!
The easy way to measure them is to weigh yourself and an empty container on your home bathroom scale, then stand on it again holding your container of tomatoes.
At right is a picture of tomatoes from my garden - they are so much better than anything from the grocery store. And if you don't have enough, a pick-your-own farm is the pace to go! Below are 4 common varieties that will work:
| Top left: Beefsteak | Top right: Lemon Boy, yellow |
| Bottom left: Roma, paste-type | Bottom right: Better Boy |
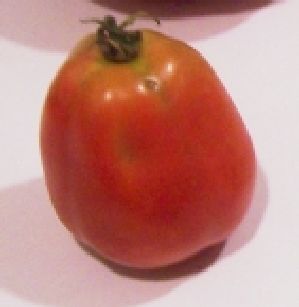 The
picture at left shows the best variety of tomato to use: Roma; also called
paste tomatoes. they have fewer sides, thicker, meatier walls, and
less water.
The
picture at left shows the best variety of tomato to use: Roma; also called
paste tomatoes. they have fewer sides, thicker, meatier walls, and
less water.
Also, you don't want mushy, bruised or rotten tomatoes!
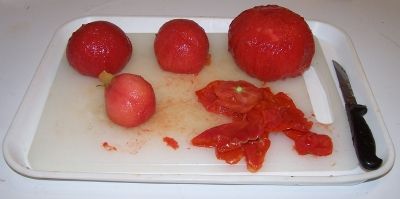
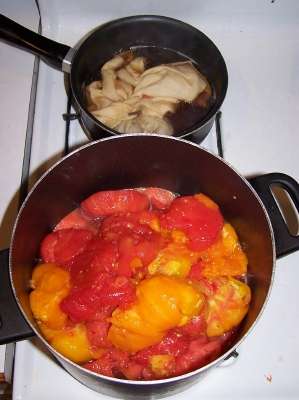
Step 2 - Removing the tomato skins
Here's a trick you may not know:
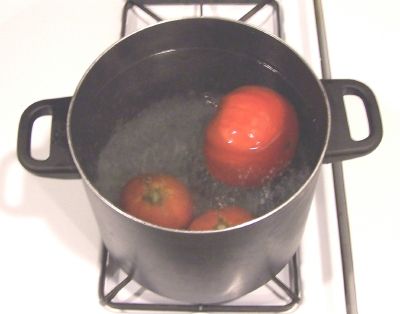 put the tomatoes, a few at a time in a large pot
of boiling water for no more than 1 minute (30 - 45 seconds is usually
enough)
put the tomatoes, a few at a time in a large pot
of boiling water for no more than 1 minute (30 - 45 seconds is usually
enough)
then....
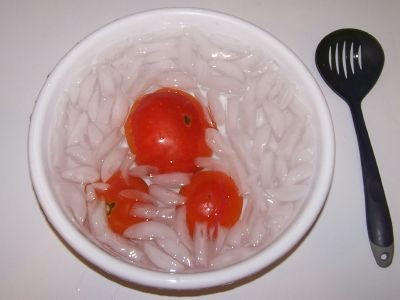 Plunge
them into a waiting bowl of ice water.
Plunge
them into a waiting bowl of ice water.
This makes the skins slide right off of the tomatoes! If you leave the skins in, they become tough and chewy in the sauce, not very pleasant.
Step 3 - Removing seeds and water
After you have peeled the skins off the tomatoes, cut the tomatoes in
half. Now we need to remove the seeds and excess water.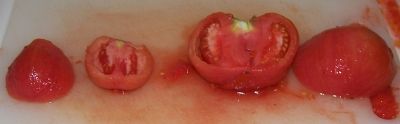
Step 4 - Squeeze of the seeds and water
Just like it sounds: wash your hands then squeeze each tomato and use your finger or a spoon to scoop and shake out most of the seeds. You don't need to get fanatical about it; removing just most will do.
![]()
Step 5 - Drain the tomatoes
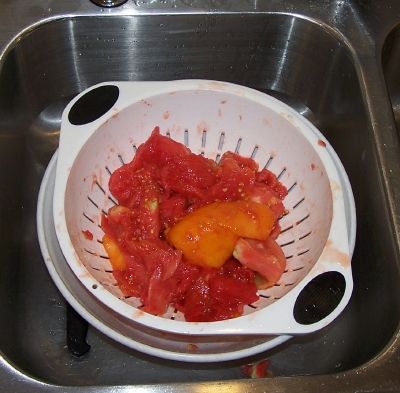 Toss
the squeezed (Squozen? :) tomatoes into a colander or drainer, while you
work on others. This helps more of the water to drain off. You may
want to save the liquid: if you then pass it through a sieve, screen or
cheesecloth, you have fresh tomato juice; great to drink cold or use in
cooking!
Toss
the squeezed (Squozen? :) tomatoes into a colander or drainer, while you
work on others. This helps more of the water to drain off. You may
want to save the liquid: if you then pass it through a sieve, screen or
cheesecloth, you have fresh tomato juice; great to drink cold or use in
cooking!
Step 6. Seasonings
Some of the seasonings will straight into the pot with the tomatoes, the rest will go into a spice bag you make from a piece of cheesecloth. Put the tomatoes in a large pot to start simmering.
Into the pot of simmering tomatoes, put: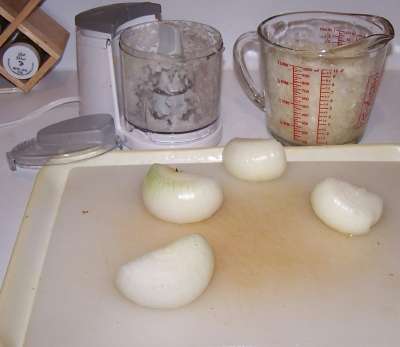
- 1 cup finely chopped/diced onions
- 1 teaspoon salt (optional - I don't put any in!)
- 1 cloves of garlic, minced
- 1 teaspoon black pepper
- 1/2 teaspoon cayenne pepper
- 1 cup sugar (white or brown)
(Diabetics: yes, you could use Stevia, Splenda, Agave, Honey, etc - to taste!)
Optional variations:
- add 1/2 teaspoon dry mustard
- and/or add 1/4 teaspoon ground cinnamon
 Onto
a piece of cheesecloth (about 12 inches square) put 3 tablespoons celery
seed. Tie the corners of the cloth together to make a little bag (you can
use a plastic twist tie - I use one from a oven browning bag) and put the
bag into a small sauce pot with
Onto
a piece of cheesecloth (about 12 inches square) put 3 tablespoons celery
seed. Tie the corners of the cloth together to make a little bag (you can
use a plastic twist tie - I use one from a oven browning bag) and put the
bag into a small sauce pot with
- 3 cups of 5% apple cider vinegar.
Let it simmer for 30 minutes, while the tomatoes cook (you may need to add more vinegar, so you finish with 3 cups of liquid)
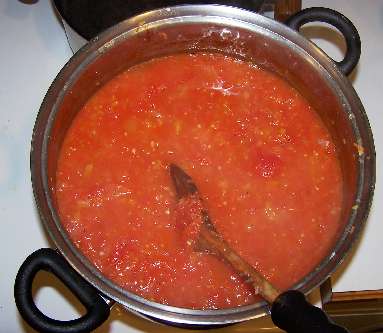
Step 7 - Bring the tomatoes to a gentle simmer
Cook the tomatoes for about 20 - 30 minutes over medium heat to make them mushy enough to go through your food mill or sieve.
Step 8 - Removing the seeds and skins
 Run
the cook tomato mixture through the food mill or sieve. Discard the seeds
and skins that remain in the sieve..
Run
the cook tomato mixture through the food mill or sieve. Discard the seeds
and skins that remain in the sieve..
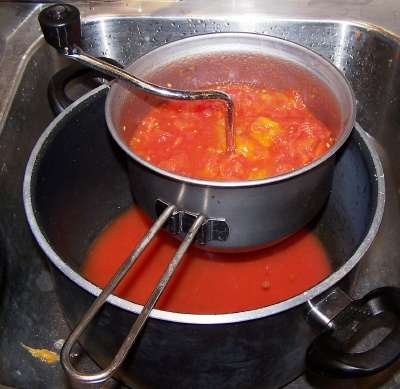
Step 9 - Add the seasoned vinegar and cook down to thicken the mix
 Now
it's time to add the seasoned vinegar from step (minus the
cheesecloth bag, which you may now discard), and cook down the mixture to
thicken it. You can do it on the stove over low - medium heat,
stirring frequently, as shown at right.. OR....
Now
it's time to add the seasoned vinegar from step (minus the
cheesecloth bag, which you may now discard), and cook down the mixture to
thicken it. You can do it on the stove over low - medium heat,
stirring frequently, as shown at right.. OR....
.. put it
into a crockpot and let it cook down by itself. this method is
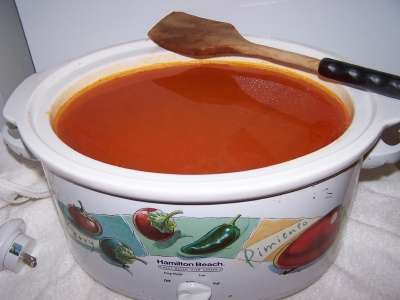 much
easier! You should always start by setting the crock pot on low or
medium heat. I would recommend starting with low heat because you do
not want to risk burning it! If it doesn't get hot enough to reduce in 12
hours, bump the setting up to the next position, and watch more carefully,
in case that turns out to be too hot! I find it takes about 12 hours, but each crockpot may vary.
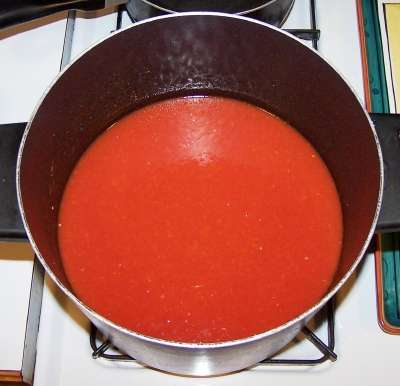
You want it to get as thick as you like your ketchup, remembering that it
will also thicken a little bit after you cool it. The photo doesn't
show it, but I cover with a splatter screen or the lid on loosely (so the
steam can escape)
much
easier! You should always start by setting the crock pot on low or
medium heat. I would recommend starting with low heat because you do
not want to risk burning it! If it doesn't get hot enough to reduce in 12
hours, bump the setting up to the next position, and watch more carefully,
in case that turns out to be too hot! I find it takes about 12 hours, but each crockpot may vary.
You want it to get as thick as you like your ketchup, remembering that it
will also thicken a little bit after you cool it. The photo doesn't
show it, but I cover with a splatter screen or the lid on loosely (so the
steam can escape)
Step 10 - Get the jars and lids sanitizing
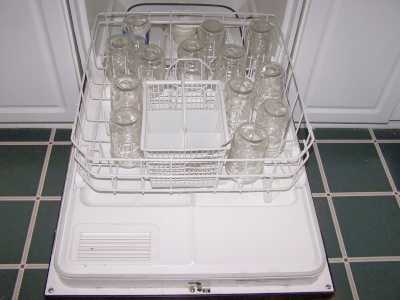 The
dishwasher is fine for the jars; especially if it has a "sanitize" cycle.
I get that going about 30 minutes before I figure the ketchup has cooked
down enough (yes, that's a bit vague!)
The
dishwasher is fine for the jars; especially if it has a "sanitize" cycle.
I get that going about 30 minutes before I figure the ketchup has cooked
down enough (yes, that's a bit vague!)
Be sure to let it go through the rinse cycle to get rid of any soap! It's also a good time to start heating up the water in the canner and the small pan of water to warm the lids to soften the adhesive.
Lids: Put the very hot (but not quite boiling; around 180 F,
steaming water is fine)
water for at least several minutes.
Note: everything gets sanitized in the water bath (step 12), so this just helps to ensure there is no spoilage later!)
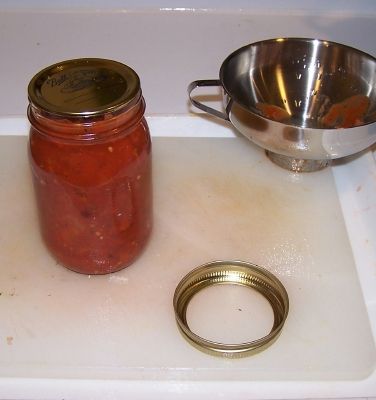
Step 11 - Fill the jars with the ketchup and put the lid and rings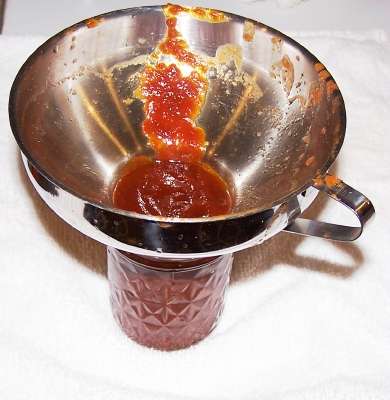 on
on
Fill them to within 1/4-inch of the top, seat the lid and hand-tighten the ring around them. Keep the ketchup hot in the pot, and move quickly to fill and seal the jars and get them in the canner, to avoid them cooling down.
 Be
sure the contact surfaces (top of the jar and underside of the ring) are
clean to get a good seal!
Be
sure the contact surfaces (top of the jar and underside of the ring) are
clean to get a good seal!
Step 12 - Process (boil) the jars in the canner
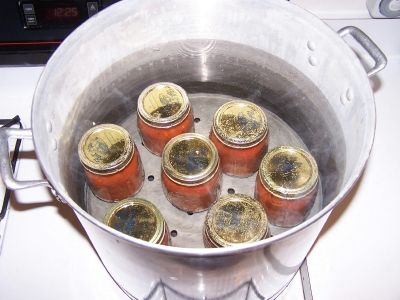 Put
them in the canner and keep them covered with at least 1 inch of water.
Keep the water boiling. Process the jars in a boiling-water bath for 35
minutes for pints and 40 minutes for quarts. Remember to adjust the time
if you are at a different altitude other than sea level!
Put
them in the canner and keep them covered with at least 1 inch of water.
Keep the water boiling. Process the jars in a boiling-water bath for 35
minutes for pints and 40 minutes for quarts. Remember to adjust the time
if you are at a different altitude other than sea level!
| Recommended process time for Tomato Ketchup in a boiling-water canner. | |||
| Process Time at Altitudes of | |||
| Jar Size | 0 - 1,000 ft | 1,001 - 6,000 ft | Above 6,000 ft |
| Pints | 15 min | 20 | 25 |
If you have a Pressure Canner, be sure to follow their directions.
 If
you have a Pressure Canner, use it and process the sauce according to the
directions that came with it. If you don't have these, a fallback is the
same time as for a water bath: 15 minutes for pint jars at a pressure of 10 to 11 pounds. I prefer a
pressure canner or a larger 33 quarter water bath canner, shown at right - both
are much deeper, so there is no mess, no boilovers, and allows you to cover the
tallest jars with several inches of water to ensure safety! To order one, click
on
Canning supplies and select
the canner that is right for your stove (regular or flat bottomed for glass or
ceramic stoves)
If
you have a Pressure Canner, use it and process the sauce according to the
directions that came with it. If you don't have these, a fallback is the
same time as for a water bath: 15 minutes for pint jars at a pressure of 10 to 11 pounds. I prefer a
pressure canner or a larger 33 quarter water bath canner, shown at right - both
are much deeper, so there is no mess, no boilovers, and allows you to cover the
tallest jars with several inches of water to ensure safety! To order one, click
on
Canning supplies and select
the canner that is right for your stove (regular or flat bottomed for glass or
ceramic stoves)
Step 13 - Done
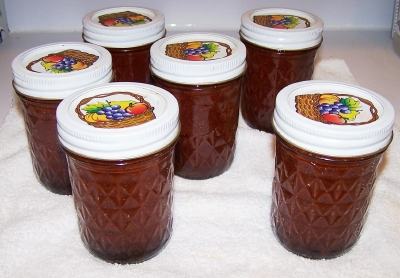 Lift
the jars out of the water and let them cool without touching or bumping
them in a draft-free place (usually takes overnight) You can then
remove the rings if you like, but if you leave them on, at least loosen
them quite a bit, so they don't rust in place due to trapped moisture.
Once the jars are cool, you can check that they are sealed verifying that
the lid has been sucked down. Just press in the center, gently, with your
finger. If it pops up and down (often making a popping sound), it is not
sealed. If you put the jar in the refrigerator right away, you can still
use it. Some people replace the lid and reprocess the jar, then that's a
bit iffy. If you heat the contents back up, re-jar them (with a new lid)
and the full time in the canner, it's usually ok.
Lift
the jars out of the water and let them cool without touching or bumping
them in a draft-free place (usually takes overnight) You can then
remove the rings if you like, but if you leave them on, at least loosen
them quite a bit, so they don't rust in place due to trapped moisture.
Once the jars are cool, you can check that they are sealed verifying that
the lid has been sucked down. Just press in the center, gently, with your
finger. If it pops up and down (often making a popping sound), it is not
sealed. If you put the jar in the refrigerator right away, you can still
use it. Some people replace the lid and reprocess the jar, then that's a
bit iffy. If you heat the contents back up, re-jar them (with a new lid)
and the full time in the canner, it's usually ok.
Other Equipment:
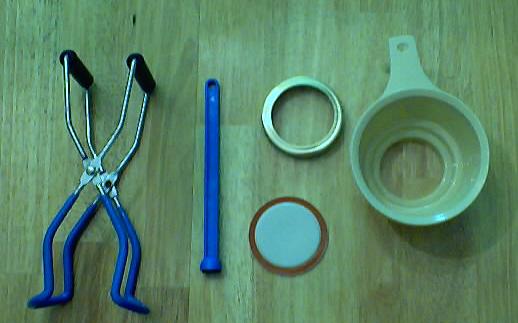 From
left to right:
From
left to right:
- Jar lifting tongs
to pick up hot jars - Lid lifter
- to remove lids from the pot
of boiling water (sterilizing ) - Lids
- disposable - you may only
use them once - Ring
- holds the lids on the jar until after
the jars cool - then you remove them, save them and reuse them - Canning Jar funnel
- to fill the jars
Summary - Cost of Making Homemade Ketchup - makes 7 - 8 oz jars* |
||||
| Item | Quantity | Cost in 2025 | Source | Subtotal |
| Tomatoes | 25 lbs (to make about 16 cups of prepared tomato) | free from the garden, or $0.50 cents at a PYO | Garden | $0.00 |
| Canning jars (8 oz size), includes lids and rings | 7 jars | $8.50/dozen 8 oz jars | Grocery stores, like Publix, Kroger and Safeway and local "big box" stores; sometimes Big Lots and even hardware stores | $5.00 |
| Onions | 1 lb | free from the garden, or $0.50/lb at a PYO | Garden, farm, market | $0.50 |
| Sugar | 1 cups | $0.50 | $0.50 | |
| Vinegar (5%) white | 3 cups | $0.50 (in a large jug) | grocery store | $0.50 |
| seasoning | See step 7 | $1.00? assuming you already have them. just the fraction you will use. | Grocery stores, like Publix, Kroger and Safeway and local "big box" stores | $1.00 |
| Total | $4.50 total or about $1.07 per jar INCLUDING the jars - which you can reuse! |
|||
|
* - This assumes you already have the pots, pans, ladles,, and reusable equipment. Note that you can reuse the jars! |
||||
FAQs, Questions/Answers
Larger jars? Comments from a visitor on September 24, 2013: "I love your website and have used it for many canning projects. I do have a question. I am interested in making ketchup. We have a family of seven, so canning in pints seems impractical. If I use quarts, how much time would I need to process them for? My elevation is 3,000 - 6,000 ft. Also, as it is more practical to can most things in quarts, is there a standard amount of minutes I could increase to any canning recipe that calls for pints? Thanks!"
Well, that's the problem no lab, university or authority has actually tested it in larger containers, so you will be conducting your own tests on your family. That's not to say, it can't be canned safely in larger jars, just that we don't know the parameters because no food scientist has tested it.
Until they develop reliable lab test data, I wouldn't go larger than a pint jar.


Looking for canning equipment and supplies?
Water bath canner with a jar rack
Pressure canners for gas, electric and induction stoves: Presto 23Qt or T-fal 22Qt
Canning scoop (this one is PERFECT)
Ball Blue book (most recent version)
Jars: 8oz canning jars for jams
Find Other types of farms:
Farm markets and roadside stands
Road trips and camping resources
Local Honey, apiaries, beekeepers
Consumer fraud and scams information
Home canning supplies at the best prices on the internet!
Maple Syrup Farms, sugarworks, maple syrup festivals
Environmental information and resources
Farms For Your Event for birthday parties, weddings, receptions, business meetings, retreats, etc.
Festivals - local fruit and vegetable festivals
Get the
most recent version of
the Ball Blue Book
