
Looking for How to Can Cherries at Home, Easily! in 2025? Scroll down this page and follow the links. And if you bring home some fruit or vegetables and want to can, freeze, make jam, salsa or pickles, see this page for simple, reliable, illustrated canning, freezing or preserving directions. There are plenty of other related resources, click on the resources dropdown above. If you are having a hard time finding canning lids, I've used these, and they're a great price & ship in 2 days.
If you have questions or feedback, please let me know! There are affiliate links on this page. Read our disclosure policy to learn more.
How to Can Cherries at Home, Easily!
How to Can Cherries
Using Whole Sweet or Sour Cherries
Cherries have such a brief season of availability fresh that it's a shame to miss it and have to rely on store bought for the rest of the year! Instead, you can easily can (or "put up") from cherries that you pick or buy fresh. And if you want to make your own cherry pie filling in advance, see this page for those directions! We will use the "hot pack" method here, in which the cherries are heated briefly (for 5 minutes) with the hot syrup) as this preserves the color and flavor better than the "raw pack" method!
Ingredients and Equipment: What will you need?
-
The average quart requires 21/2 pounds of cherries and a canner usually holds 7 quart jars, so you will need about:
- 18 pounds of cherries to make one canner load of 7 quart jars.
- 12 pounds to make a canner load of 9 pint jars.
Also, if you buy the cherries at a farmer's market, a "lug" weighs 25 pounds and usually yields 8 to 12 quarts.
- Water, fruit juice (such as apple juice or white-grape juice), or sugar or sweetener syrup solution.
- Lid lifter (has a magnet to pick the lids out of the almost-boiling water where you sanitize them. ($4 at mall kitchen stores and local "big box" stores, but it's usually cheaper online from our affiliates)
- Jar grabber (to pick up the hot jars)Jar funnel ($4 at mall kitchen stores and local "big box" stores, but it's usually cheaper online from our affiliates)
- At least 1 large pot
- Large spoons and ladles,
- Ball jars (Publix, Kroger, other grocery stores and some "big box" stores carry them - now about $12 per dozen quart jars (up 50% in 2 years!) including the lids and rings)
- 1 water bath canner (a huge pot with a lifting rack to sanitize the jars of applesauce after filling (about $30 to $35 at mall kitchen stores and local "big box" stores, but it's usually cheaper online from our affiliates) You CAN use a large pot instead, but the canners are deeper, and have a rack top make lifting the jars out easier. If you plan on canning every year, they're worth the investment.
-
Cherry pitter: without one of these, it's pretty hard to remove the pits from a fresh cherry.
See here for related tools, equipment, supplies on Amazon
See here for related tools, equipment, supplies on Amazon
See here for related tools, equipment, supplies on Amazon
Recipe and Directions
Step 1 - Selecting the cherries
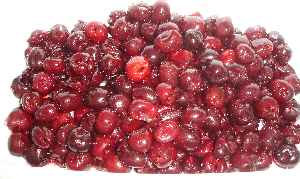 Look for bright, uniformly-colored cherries that are ripe, but
not mushy. If the taste good to you, then , they're right!
Look for bright, uniformly-colored cherries that are ripe, but
not mushy. If the taste good to you, then , they're right!
Step 2 - Wash, the Cherries
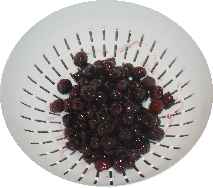 Pull the stems off and wash the cherries in cold water (no soap!).
Remove the pits, if desired (it helps a LOT to have a pitter).
Pull the stems off and wash the cherries in cold water (no soap!).
Remove the pits, if desired (it helps a LOT to have a pitter).
Step 3 - Wash the jars and lids
Canning jars in the dishwasherNow's a good time to get the jars ready, so you won't be rushed later. The dishwasher is fine for the jars; especially if it has a "sanitize" cycle, the water bath processing will sanitize them as well as the contents! If you don't have a dishwasher with a sanitize cycle, you can wash the containers in hot, soapy water and rinse, then sanitize the jars by boiling them 10 minutes, and keep the jars in hot water until they are used. Leave the jars in the dishwasher on "heated dry" until you are ready to use them. Keeping them hot will prevent the jars from breaking when you fill them with the hot syrup solution.
Put the lids into a pan of hot, but not quite boiling water (that's what the manufacturer's recommend) for 5 minutes, and use the magnetic "lid lifter wand" to pull them out.
Step 4 - Poke Your Cherries (if unpitted)
Pit the cherries, if you like them pitted! If you pit the cherries, place the cherries in water with some Fruit Fresh (or other ascorbic acid )to prevent stem-end discoloration. If you can't get hold of Fruit Fresh, 2 or 3 tablespoons of lemon juice will do an ok job!
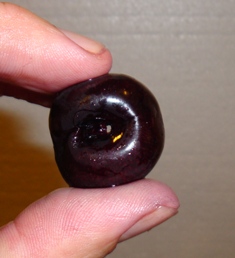
If you are canning the cherries unpitted, prick the skins on opposite sides with a clean needle (or fork) to prevent them from splitting. If you have a cherry pitter, now's the time to pit them!
Here's how to pit cherries:
 With cherries you must remove the pits. There
are inexpensive cherry pitters that work fine for occasional use, or larger more sophisticated pitters if you're going to be doing a lot. As with other fruit,
also pick out any stems and leaves.
With cherries you must remove the pits. There
are inexpensive cherry pitters that work fine for occasional use, or larger more sophisticated pitters if you're going to be doing a lot. As with other fruit,
also pick out any stems and leaves.
Pit the fresh cherries, and keep them in cold water with 1/4 lemon juice add (to prevent browning)
 .
.
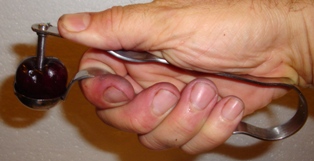
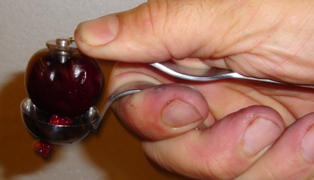
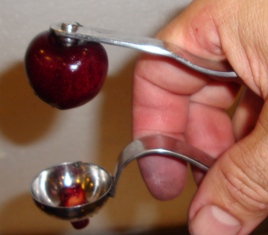
A cherry pitter is inexpensive and easy to use, once you learn the trick. The goal is to push down so the metal stem holds the pit down against the opening in the bottom of the cup. The pits will not go through the hole; it is just to help trap them. then releasing your grip, the cherry rides up on the metal stem, while the pit remains trapped in the cup, stuck in the hole. Then just push the cherry off and use your thumb on the underside of the cup, to push the pit back out.
See here for related tools, equipment, supplies on Amazon
BEST PITTERS AVAILABLE: Leifheit Pitter and the Norpro Deluxe Cherry Pitter.
These things are
amazing; easy fast and reliable. The Norpro can handle larger volumes of cherries reliably! I can pit a cherry per second. The Leifeit is even
better, as it is larger!
Comments from a visitor on July 1, 2019: "I wanted to let you know about the Norpro Deluxe
Cherry Stoner/Pitter. These things are GREAT!!! They pit cherries reliably and remarkably fast! Just tell your readers to NOT lose
the orange inserts (they may be other colors now) that come with the cherry pitter. They're definitely necessary to actually pit the
cherries."
See here for related tools, equipment, supplies on Amazon
See here for related tools, equipment, supplies on Amazon
See here for related tools, equipment, supplies on Amazon
See these videos about setting up and using the Norpro Deluxe Cherry Pitter, to see just how easy and fast it is.
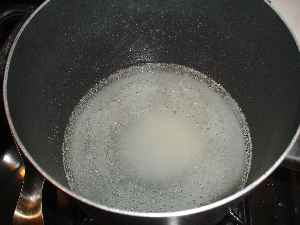
Step 5 - Prepare the syrup, bring it to boiling
Cherries may be canned in water, fruit juice (such as apple juice or white-grape juice), or syrup. It normally takes about 1/2 cup of liquid per jar. For directions on how to prepare these syrups, see this page!
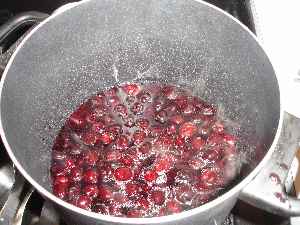 Step 6 - Add the cherries to the syrup
Add the cherries to the syrup in the pot and
bring back to a boil (about 5 minutes)
Step 7 - Ladle the cherries and syrup into the jars
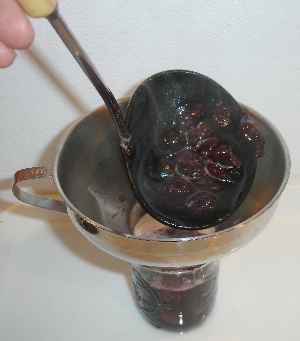 That's all there is to it: fill each jar to
within 1/2 inch from the top.
That's all there is to it: fill each jar to
within 1/2 inch from the top.
You may want to ladle the cherries with a slotted spoon into the jars first, then pour the hot syrup over them. Tap the jars gently free any trapped air bubbles.
You may also slide a clean table knife inside the jar and stir gently to release trapped air bubbles.
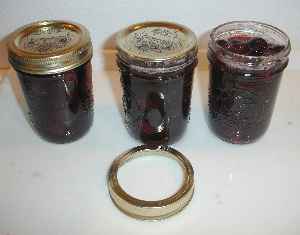 Step 8 - Put the lids and rings on the jars
Put an unused lid on the jar and gently tighten (not too tight) the ring down around it.
Step 9 - Process the jars in the canning water bath
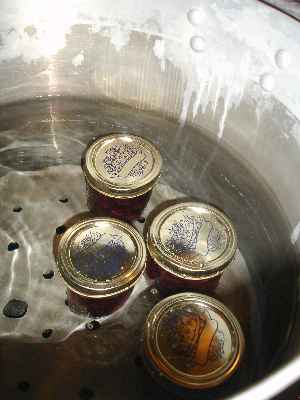 How long to process the jars in the boiling
water? It depends upon the type of canner you have and your altitude. Most people use a simple boiling water canner - see table 1. This works fine
for cherries. In this type of canner, most people will be boiling the jars for 15 or 20 minutes. For pressure canners, see tables 2 and 3 below!
How long to process the jars in the boiling
water? It depends upon the type of canner you have and your altitude. Most people use a simple boiling water canner - see table 1. This works fine
for cherries. In this type of canner, most people will be boiling the jars for 15 or 20 minutes. For pressure canners, see tables 2 and 3 below!
| Table 1. Recommended Process Time for Sweet or Sour Cherries, Whole in boiling-water canner. | |||||
| Process at Altitudes of: | |||||
| Style of Pack | Jar Size | 0 - 1,000 ft | 1,001 - 3,000 ft | 3,001 - 6,000 ft | Above 6,000 ft |
| Hot | Pints | 15 min | 20 | 20 | 25 |
| Quarts | 20 | 25 | 30 | 35 | |
Pressure canners
You may want to try raw pack method if you have a Pressure Canner, since the cherries will be exposed to higher heat for a longer time.
| Table 2. Process Times for Sweet or Sour Cherries, Whole in a Dial-Gauge Pressure Canner. | ||||||
| Canner Pressure (PSI) at Altitudes of | ||||||
| Style of Pack | Jar Size | Process Time (Min) | 0 - 2,000 ft | 2,001 - 4,000 ft | 4,001 - 6,000 ft | 6,001 - 8,000 ft |
| Hot | Pints | 8 | 6 | 7 | 8 | 9 |
| Quarts | 10 | 6 | 7 | 8 | 9 | |
| Raw | Pints or Quarts | 10 | 6 | 7 | 8 | 9 |
| Table 3. Process Times for Sweet or Sour Cherries, Whole in a Weighted-Gauge Pressure Canner. | ||||
| Canner Pressure (PSI) at Altitudes of | ||||
| Style of Pack | Jar Size | Process Time (Min) | 0 - 1,000 ft | Above 1,000 ft |
| Hot | Pints | 8 | 5 | 10 |
| Quarts | 10 | 5 | 10 | |
| Raw | Pints or Quarts | 10 | 5 | 10 |
Step 10 - Remove and cool the jars - Done
 Once the processing time is complete,
just ift the jars out of the water and let them cool without touching or bumping them in a draft-free place (usually takes overnight) You can then
remove the rings if you like, but if you leave them on, at least loosen them quite a bit, so they don't rust in place due to trapped moisture. Once the
jars are cool, you can check that they are sealed verifying that the lid has been sucked down. Just press in the center, gently, with your finger. If it
pops up and down (often making a popping sound), it is not sealed. If you put the jar in the refrigerator right away, you can still use it. Some people
replace the lid and reprocess the jar, then that's a bit iffy. If you heat the contents back up, re-jar them (with a new lid) and the full time in the
canner, it's usually ok.
Once the processing time is complete,
just ift the jars out of the water and let them cool without touching or bumping them in a draft-free place (usually takes overnight) You can then
remove the rings if you like, but if you leave them on, at least loosen them quite a bit, so they don't rust in place due to trapped moisture. Once the
jars are cool, you can check that they are sealed verifying that the lid has been sucked down. Just press in the center, gently, with your finger. If it
pops up and down (often making a popping sound), it is not sealed. If you put the jar in the refrigerator right away, you can still use it. Some people
replace the lid and reprocess the jar, then that's a bit iffy. If you heat the contents back up, re-jar them (with a new lid) and the full time in the
canner, it's usually ok.
Of course, if you are using a Pressure Canner, wait until it cools down and the pressure is released before opening it!


Looking for canning equipment and supplies?
Water bath canner with a jar rack
Pressure canners for gas, electric and induction stoves: Presto 23Qt or T-fal 22Qt
Canning scoop (this one is PERFECT)
Ball Blue book (most recent version)
Jars: 8oz canning jars for jams
Find Other types of farms:
Farm markets and roadside stands
Road trips and camping resources
Local Honey, apiaries, beekeepers
Consumer fraud and scams information
Home canning supplies at the best prices on the internet!
Maple Syrup Farms, sugarworks, maple syrup festivals
Environmental information and resources
Farms For Your Event for birthday parties, weddings, receptions, business meetings, retreats, etc.
Festivals - local fruit and vegetable festivals
Get the
most recent version of
the Ball Blue Book
