
How to dry your own basil, mint and tarrogon from fresh garden herbs (directions, recipe, with photos and free)
How to Dry Basil, Mint (Peppermint, Spearmint, etc.), Tarragon or Lemon Balm herbs - From fresh garden plants!
Imagine how your dishes will taste this winter if you have your own garden herbs to add to them. Its easy to dry or freeze some for a year-round supply of good quality herbs! Here's how to do it, complete instructions in easy steps and completely illustrated. You don't need any special equipment: air drying or room drying is the easiest, as well as, most inexpensive method for preserving herbs. Moisture evaporates slowly and naturally during air drying, leaving the precious herb oils behind. Dehydrators are useful if you want to dry large quantities of herbs or you have high moisture herbs such as basil. Only use a microwave oven as a last resort for drying, as microwaves literally cook the herbs producing very poor quality. A better choice is a warmed (but off) oven.
Ingredients and Equipment
- fresh Basil, Tarragon, Lemon Balm or Mint - any quantity.
- Oven OR a room dehumidifier
- Ziploc bags, glass or plastic containers, OR Vacuum food sealer with bags
Instructions
Step 1 - What to look for
The best time to cut herbs for drying is just before they flower. This is when the leaves have the most oil, which is what gives herbs aroma and flavor. Different varieties of herbs flower at different times of the season, so look for buds or newly opened flowers as your clue for harvesting. But, if your herbs have already flowered, they can still be harvested and dried. It' slightly better to cut herbs in mid-morning when the leaves are dry but before the hot midday sun, but early evening is also good!
Step 2 - Cut the herbs
Use a sharp knife or scissors to cut large stems or branches from
mature plants. Gently shake each branch to remove insects. Examine each
branch and remove old, damaged or diseased leaves.
Step 3 - Rinse and dry the herbs
Rinse each branch in cold water and dry with towels or paper towels to remove all visible water. Wet herbs tend to mold which destroys the whole bunch.
Lay the leaves on a paper towel, single layer without allowing leaves to touch. Cover with another towel and another layer of leaves. Five layers may be dried at one time using this method.
Step 4 - Drying
Option 1: in a food dehydrator
Food dehydrators are made just for this purpose, so they're obviously ideal.
Just spread the herbs out on the racks, leaving space between them for the air to circulate, and only one leaf thick on each rack.
Dehydrators (see this page for more info, models and prices of food dryers) are faster, easier and more useful if you want to dry larger quantities of herbs or you have high moisture
Option 2: Oven dry
As mentioned earlier, basil, tarragon, lemon balm and mints have high moisture content and will mold if not dried quickly.
Dry in a very cool oven (high temperatures will result in tasteless herbs). Basically, just turn the oven on to "warm" (140 to 200 F) (or 65 degrees C to 93 degrees C, gas mark 1) for 20 minutes, then turn it off and pop in the herbs.
Option 3: in front of a dehumidifier
If you have a dehumidifier, I have found that spreading the branches loosely on a cake cooling rack (which allows the air to circulate) and placing this by the outlet from the dehumidifier, where the warm and very dry air exits the dehumidifier works great, and much faster!
Step 5 - Dry the herbs to the correct moisture content
Leave undisturbed overnight and check them in the morning. I find that they dry out in a day or two, as long as they are not piled on top of each other. If you are using the oven method, just turn it on to "warm" again for another 10 or 15 minutes twice per day.
As the leaves are dry, check for any signs of mold growth. Toss the entire bunch if it becomes moldy and try again.
Step 6 - Separate the leaves from the stems
Strip dried leaves from stems and discard the stems. Crush the leaves if desired, but whole herbs retain their flavor longer than crushed, ground or rubbed herbs. I wait until I use the herbs later, to crush them.
Step 7 - Storing the herbs
Store dried herbs in small airtight containers away from the light. Zip closure plastic bags, colored bailing wire jars and ceramic crocks can be used for storage. My preference is FoodSaver vacuum bags - it removes all the air, so the dried herbs retain more of their flavor. TIP: If you don't own a vacuum food sealer to freeze foods, place food in a Ziploc bags, zip the top shut but leave enough space to insert the tip of a soda straw. When straw is in place, remove air by sucking the air out. To remove straw, press straw closed where inserted and finish pressing the bag closed as you remove straw.
Be sure to label and date each container.
Store herbs in a cool, dry, dark place (away from sunlight). Dried herbs keep for years but for best results use within a year. Most herbs will diminish in flavor with age and a larger amount will be needed to achieve the desired flavor in cooking.
Tips
To release the full flavor, crush whole herb leaves or use a mortar and pestle to grind, just before adding to the recipe.
When using dried herbs, add to soups and stews during the last half-hour of cooking or follow recipe directions. Be creative and add dried herbs to flavor your favorite foods.
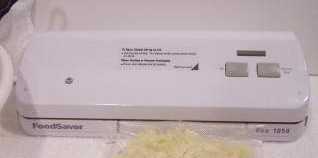 A vacuum-sealed FoodSaver bag is on top at left. You can see how the
FoodSaver really sucks out all the air, so the herbs won't dry out or get
freezer burn. That means the food inside will last many times longer. I've
been using them (and their predecessor in the marketplace, Seal-a-Meal) for
many years. If you're interested,
here's where you can get one.
A vacuum-sealed FoodSaver bag is on top at left. You can see how the
FoodSaver really sucks out all the air, so the herbs won't dry out or get
freezer burn. That means the food inside will last many times longer. I've
been using them (and their predecessor in the marketplace, Seal-a-Meal) for
many years. If you're interested,
here's where you can get one.


Looking for canning equipment and supplies?
Water bath canner with a jar rack
Pressure canners for gas, electric and induction stoves: Presto 23Qt or T-fal 22Qt
Canning scoop (this one is PERFECT)
Ball Blue book (most recent version)
Jars: 8oz canning jars for jams
Find Other types of farms:
Farm markets and roadside stands
Road trips and camping resources
Local Honey, apiaries, beekeepers
Consumer fraud and scams information
Home canning supplies at the best prices on the internet!
Maple Syrup Farms, sugarworks, maple syrup festivals
Environmental information and resources
Farms For Your Event for birthday parties, weddings, receptions, business meetings, retreats, etc.
Festivals - local fruit and vegetable festivals
Get the
most recent version of
the Ball Blue Book
