
Looking for How to make naturally fermented Sauerkraut, naturally - made easy, using natural ingredients, and illustrated! in 2025? Scroll down this page and follow the links. And if you bring home some fruit or vegetables and want to can, freeze, make jam, salsa or pickles, see this page for simple, reliable, illustrated canning, freezing or preserving directions. There are plenty of other related resources, click on the resources dropdown above. If you are having a hard time finding canning lids, I've used these, and they're a great price & ship in 2 days.
If you have questions or feedback, please let me know! There are affiliate links on this page. Read our disclosure policy to learn more.
How to make naturally fermented Sauerkraut, naturally - made easy, using natural ingredients, and illustrated!
 Making Homemade Natural Sauerkraut
Using the natural fermentation homemade method
Yield: 1 gallon of sauerkraut per 5 lbs of cabbage
Click here for a PDF print version
Making and canning your own Sauerkraut the old-fashioned fermented way, with all natural ingredients has never been easier!! Here's how to do it, in easy steps and completely illustrated. This method is so easy, ANYONE can do this! It's a great thing to do with your kids!
NOTE: Photos are coming soon!
Ingredients and Equipment
- Cabbage (1 to 8 heads up to 25 lbs), (Each head is anywhere from 2 lbs to 4 lbs on average,
1 medium sized head of cabbage, about 2.5 lbs is perfect to fill one 1/2 gallon jar and still leave 3 or 4 inches of spaces above the weight or spring.
If you're making a big batch, but since it takes a 1-gallon container or 2 half-gallon containers for each 5 pounds of fresh cabbage, you can work in 5 lb increments, about 1 or 2 heads, depending upon how big they are.
If you're making a huge amount, a 25-pound lot of fresh cabbage will yield 8 to 10 quarts of sauerkraut. A 5-gallon crock typically holds 25 pounds. - Canning or pickling salt - sea salt or kosher salt works. NEVER use iodized table salt! About 3/4 cup for 25 lbs of cabbage or
3 tablespoons
per 5 lbs. Note that the ratio of 3 tablespoons of canning or pickling salt per 5 pounds of shredded cabbage controls the growth of pathogens. Changing the
proportions could result in an unsafe product.
What if I am on a low-salt diet? See the FAQs here. - A fermentation crock or jar.
Click here to find out more about ceramic fermentation crocks and here for
a system with screw-on airlocks that uses wide-mouth glass canning jars.
You can get half-gallon jars here. .A 5-gallon stone crock is of ideal size for fermenting about 25 pounds of fresh cabbage. For smaller quantities 1/2 gallon jars with airlocks work VERY well. Food-grade plastic and glass containers are excellent substitutes for stone crocks. Cabbage must be kept 1 to 2 inches under brine while fermenting; that's what the glass weights or spring are for. In large crocks, they often use a brine-filled bag, Do not use copper, iron, or galvanized metal containers or lead-glazed crocks. Never use garbage bags or trash liners. - Tools: to shred the cabbage. Obviously, a cutting board with a tray under it, and one of the following:
Slice Cabbage with Knives
Use a Cabbage Knife
Slice Cabbage with Mandolins (hand-held slicers)
Slice Cabbage with a Food Processor (large grating disc, not the S-blade) - Additional seasonings:
You can add, after fermentation, seasonings, like caraway seeds, juniper berries, apples, onions, garlic, and/or various herbs like thyme or dill. Personally, I like the unseasoned flavor best. It is crisp, tart/sweet and unique.
- See this page for pickling supplies, equipment, books, crocks and additives.
Directions
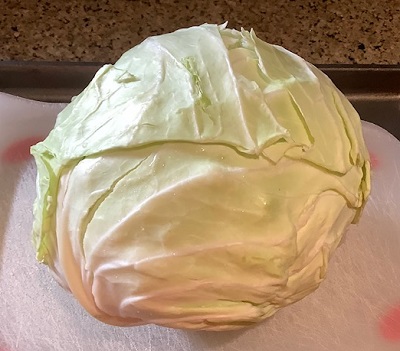
Step 1 - Selecting the cabbage
For the best sauerkraut, use firm heads of fresh cabbage and wash and shred the cabbage and start making the kraut between 24 and 48 hours after harvest.
Recommended Varieties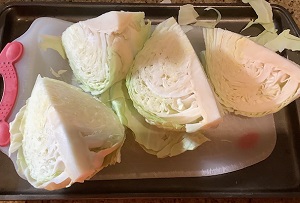
Bravo, Danish Ballhead, Excalibur, Murdoc, Premium Late Dutch, Late Flat Head, and Krautman are good varieties
for sauerkraut. Late season cabbage is considered best for making sauerkraut.
Step 2 - Wash the cabbage
Work with about 5 pounds of cabbage at a time. Discard outer leaves. Rinse
heads under cold running water and drain.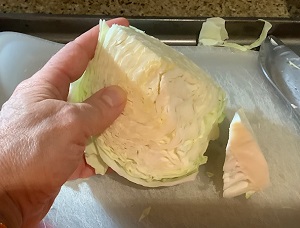
Step 3 - Make the brine
Most recipes will tell you the cabbage will "sweat" and release liquids. Yeah, but not enough. You WILL need additional brine solution. The time to make it is now, at the start, so it will cool down. Just boil 2 quarts of water and add 3 Tablespoons of salt (sea salt, kosher salt or pickling salt, NOT iodized salt). Mix it well, bring to a boil then let it cool enough that it will not crack the jars or fermentation vessel (70F to 100 F is good). Set aside.
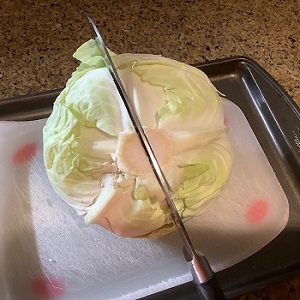
Step 4 - Shred the cabbage
Cut heads in half and then into quarters. 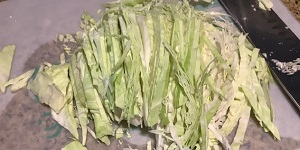
Cut out the hard center core and any other solid hard pieces.
Shred or slice to a thickness of a quarter. See the photos.
You do NOT want to make tiny pieces like cole slaw; they will float to the surface and mold.
You want long thin strands instead, which will stay below water. I just cut across each quarter cabbage.
How to shred?
Any of the following tools and methods works, obviously the food processor is best for large quantities, and a big kitchen knife works find for the just a few heads!
- Slice Cabbage with Knives
- Use a Cabbage Knife (It's a special double-bladed knife to cut cabbage faster)
- Slice Cabbage with Mandolins (hand-held slicers)
- Slice Cabbage with a Food Processor (large grating disc, not the S-blade)
See here for related tools, equipment, supplies on Amazon
Glass weights for fermentation jars
See here for related tools, equipment, supplies on Amazon See here for related tools, equipment, supplies on Amazon See here for related tools, equipment, supplies on Amazon See here for related tools, equipment, supplies on Amazon
Step 5 - Preparing for Fermentation
Put 5 lbs of shredded cabbage in a a large plastic bowl.
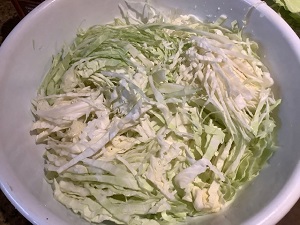
Sprinkle the 3 Tablespoons of sea salt, kosher salt or pickling salt over the cabbage and mix well.
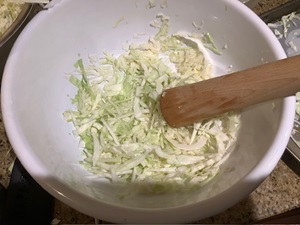
Step 6 - Pound the cabbage
Next, use the sauerkraut masher to pound the shredded cabbage in the bowl. This breaks the fibers and opens the cabbage up for fermentation. Mix thoroughly, using clean hands. Pack, pound, or squeeze the mixture with clean hands until the level of natural juices drawn from the cabbage
covers its surface. I do a couple of handfuls of shredded cabbage at a time, in a large plastic bowl. Sprinkle a little of the salt and pound for 3
minutes. Let it rest and wilt for 5 or 10 minutes.
Step 7 - Fill the jars, crock or other fermentation container
Put the cabbage in the suitable fermentation container, see
"Suitable Containers, Covers, and
Weights for Fermenting Food,", and
to each 5 lbs of shredded cabbage, add 3 tablespoons of the NON-iodized salt (sea salt, kosher salt or pickling
salt).
Then start filling and packing it in the fermentation vessel. Most people use this sauerkraut masher to pack it down.

Click here to find out more about ceramic fermentation crocks and here for a system with screw-on airlocks that uses your 1 qt to 1 gallon glass ball jars. There is also a good book about making old-fashioned sauerkraut.
Step 8 - Repeat steps 2 to 5 for the remaining cabbage
Repeat shredding, salting, and packing in 5 batches until all cabbage is in the fermentation container(s). There are custom made mashers to break the fibers and help pack the jars. Be sure it is deep enough so that its rim is at least 4 or 5 inches above the cabbage. If juice does not cover cabbage, add boiled and cooled brine (1-1/2 tablespoons of salt per quart of water).
Step 9 - Adding plates, weights and sealing
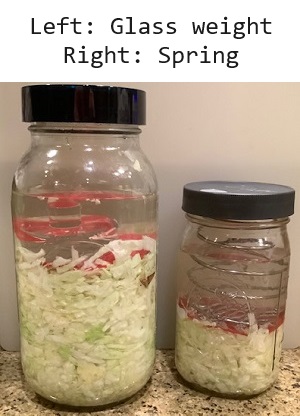
After adding prepared vegetables and brine, insert a suitably sized dinner plate, fermentation glass weight or glass pie plate inside the fermentation container. The plate must be slightly smaller than the container opening, yet large enough to cover most of the shredded cabbage or cucumbers. To keep the plate under the brine, weight it down with a glass weight or 2 to 3 sealed quart jars filled with water.
Or just use the weights made for this purpose. The Ball system comes with a spring weight that is pretty good. Add a plate and/or weights; cover container with a clean bath towel or screw on the airlock (if you are using that system). .
In my experience:
The springs are SUPERIOR to weights. Here's why: no matter how much gas is generated, the springs will always keep
the cabbage under water, since they can only be compress but so much. Weights will not. If a lot of CO2 is generated, the weight can be
pushed aside and cabbage will float to the top.
IMPORTANT TIP: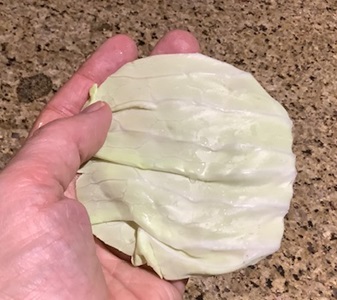
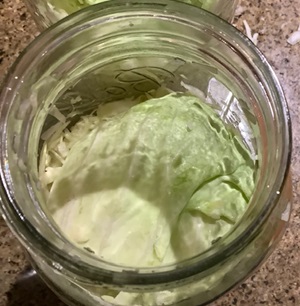
To stop small pieces from floating to the top (and rotting), cut a piece of a cabbage leaf in a round circle to fit inside the jar, THEN put the weight or spring on it. The leaf will trap the smaller pieces and hold them down! See the photo!
Another way to do it is to cut a piece of food grade plastic, like a plastic food container lid to fit inside the fermentation jar, so there is just a slight gap around the edge to let fermentation gases escape, but otherwise keeps the small pieces of cabbage below liquid. Of course, you need to put your weight on top of it. I find the cabbage leaf works best.
Step 10 - Store and ferment
Store at 70º to 75ºF while fermenting. At temperatures between 70º and 75ºF, kraut will be fully fermented in about 3 to 4 weeks; at 60º to 65ºF, fermentation may take 5 to 6 weeks. At temperatures lower than 60ºF, kraut may not ferment. Above 75ºF, kraut may become soft. Fermentation naturally stops because the acids accumulate to such an extent that further growth cannot take place.
Within a day or 2, the solution in the jars changes from clear and turns cloudy See the photo. It will turn clear again, usually after a
few days to a week, depending on the temperature, and as fermentation slows. When it is finished fermenting (2 to 4 weeks later) it will be clear
again.

If you weigh the cabbage down with a brine-filled bag, do not disturb the crock until normal fermentation is completed (when bubbling ceases). If you use jars as weight, you will have to verify the kraut 2 to 3 times each week and remove scum if it forms.
Sauerkraut should be to desired tartness, with firm texture, have brine that is not cloudy, and be free of any sign of mold or yeast growth.
Do not taste if you see mold on the surface, feel a slimy texture, or smell a bad odor.
Be sure to keep the containers in an area free of insects. People have reported that they also wrap the top of the containers with a large old (but clean) towel, muslin or layers of cheesecloth and secure it (tie it tightly), so bugs cannot get inside!
Step 11 - Finishing
Fully fermented kraut may be kept tightly covered in the refrigerator for several months. I have also kept it in the fermentation vessel, with the air lock in place, in a cool dark place for months more.
No-Can: I rarely can the sauerkraut. I just store it in the back of the fridge and it all gets eaten within 2 or 3 months.
Step 12 - Canning (optional)
or it may be canned using a water bath canner , as follows:
Hot pack - Bring kraut and liquid slowly to a boil in a large kettle, stirring frequently. Remove from heat and fill jars rather firmly with kraut and juices, leaving 1/2-inch headspace.
Raw pack - Fill jars firmly with kraut and cover with juices, leaving 1/2-inch headspace.
Which is better? The National Center for Home Food Preservation at UGA
says you generally get better results with a hot pack.k.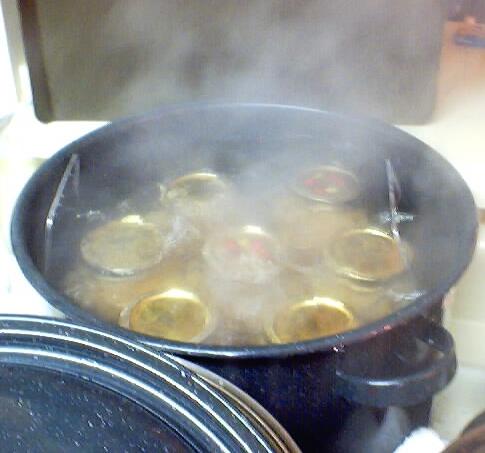
You can also freeze it!
Adjust lids and process according to the recommendations in the table below:
Recommended process time for Sauerkraut in a boiling-water canner |
|||||
| Process Time at Altitudes of | |||||
| Style of Pack | JaJar Size | 0 - 1,000 ft | 1,001 - 3,000 ft | 3,001 - 6,000 ft | Above 6,000 ft |
| Hot | Pints | 10 min | 15 | 15 | 20 |
| Quarts | 15 | 20 | 20 | 25 | |
| Raw | Pints | 20 | 25 | 30 | 35 |
| Quarts | 25 | 30 | 35 | 40 | |
Kraut Making Problems?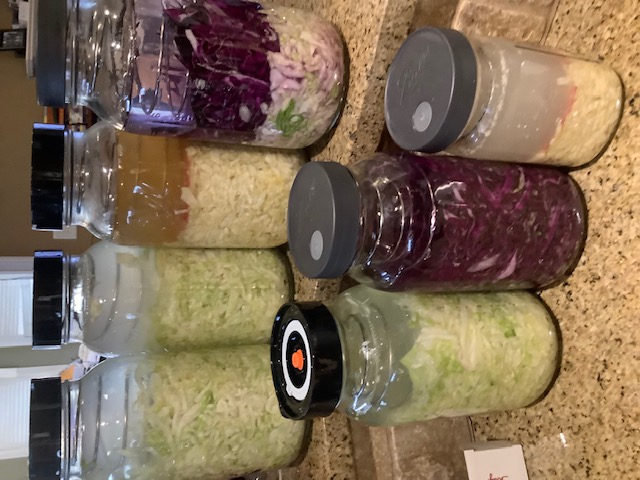
Feel free to write me, I'll try to help!
Suitable Containers, Covers and Weights for Fermenting Food
More about Crocks and other fermentation vessels or jars
A 1-gallon container (or 2 half-gallon containers) is needed for each 5 pounds of fresh cabbage or other vegetables. Therefore, a 5-gallon stone crock is of ideal size for fermenting about 25 pounds of fresh cabbage or cucumbers. Food-grade plastic and glass containers are excellent substitutes for stone crocks. Other 1- to 3-gallon non-food-grade plastic containers may be used if lined inside with a clean food-grade plastic bag. Click here to find out more about fermentation crocks. There is also a good book about making old-fashioned sauerkraut.
Caution: Be certain that foods contact only food-grade plastics. Do not use garbage bags or trash liners. Never use copper, iron, or any metal containers or lead-glazed crocks.
Fermenting sauerkraut in quart and half-gallon Mason jars fine, but the extension guys say this may result in more spoilage losses. They don't explain why. I think it would be LESS if you have an airlock. That is certainly MY experience. I have had ZERO spoilage using half-gallon glass jars with screw on airlocks.
Stone crocks are the traditional fermentation container; but many people now use glass or food-grade plastic containers. Stoneware can chip. Glass is easy to keep clean, and you can see in it while it is fermenting. I like half-gallon glass jars.
Many restaurants receive foods and ingredients in 5-gallon plastic buckets, which make decent fermentation containers.
If you are unsure about the suitability of a container, you may line it with a food-grade plastic bag, such as one designed for roasting or brining turkeys. Be sure to make sure there are no holes or leaks in it.
Other fermenting tips from the extension service
Cabbage and cucumbers must be kept 1 to 2 inches under brine while fermenting. After adding prepared vegetables and brine, insert a suitably sized dinner plate or glass pie plate inside the fermentation container. The plate must be slightly smaller than the container opening, yet large enough to cover most of the shredded cabbage or cucumbers. To keep the plate under the brine, weight it down with 2 to 3 sealed quart jars filled with water. Covering the container opening with a clean, heavy bath towel helps to prevent contamination from insects and molds while the vegetables are fermenting. Fine quality fermented vegetables are also obtained when the plate is weighted down with a very large clean, plastic bag filled with 3 quarts of water containing 4-1/2 tablespoons of salt. Be sure to seal the plastic bag. Freezer bags sold for packaging turkeys (which are thicker food-grade plastic) are suitable for use with 5-gallon containers.
FAQs - Frequently Asked Questions About Sauerkraut
- What if I am on a low-salt diet?
When you are ready to eat the sauerkraut, just rinse it off in a strainer or sieve until cold water. You will remove most salt this way, but the flavor and probiotics will remain! - How does the flavor of homemade differ from store-bought kraut?
The most noticeable difference is the "crunch". Homemade kraut stored in the fridge is never heat treated so it retains the crunchiness and a fresher crisp taste. It is not slimy nor as wilted and mushed ascanned. IF you actually prefer the slimy texture, you could also heat the kraut and let it cool before eating. Can't image why, though... - How else does homemade sauerkraut differ from store-bought?
If you store your finished kraut in the fridge, you will still have live, active probiotic cultures, unlike the canned sauerkraut from the grocery store
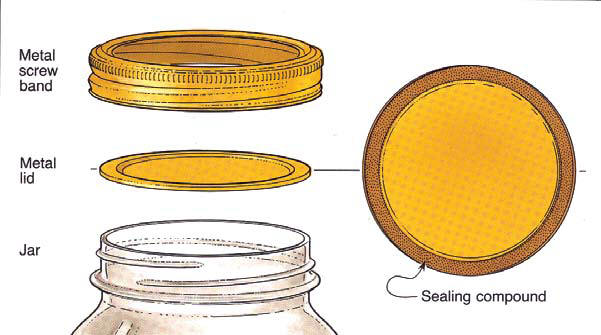
Other Equipment:
From left to right: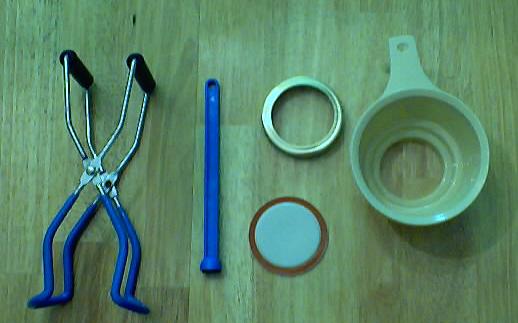
- Jar lifting tongs
to pick up hot jars - Lid lifter
- to remove lids from the pot
of boiling water (sterilizing ) - Lids
- disposable - you may only
use them once - Ring
- holds the lids on the jar until after
the jars cool - then you remove them, save them and reuse them - Canning Jar funnel
- to fill the jars


Looking for canning equipment and supplies?
Water bath canner with a jar rack
Pressure canners for gas, electric and induction stoves: Presto 23Qt or T-fal 22Qt
Canning scoop (this one is PERFECT)
Ball Blue book (most recent version)
Jars: 8oz canning jars for jams
Find Other types of farms:
Farm markets and roadside stands
Road trips and camping resources
Local Honey, apiaries, beekeepers
Consumer fraud and scams information
Home canning supplies at the best prices on the internet!
Maple Syrup Farms, sugarworks, maple syrup festivals
Environmental information and resources
Farms For Your Event for birthday parties, weddings, receptions, business meetings, retreats, etc.
Festivals - local fruit and vegetable festivals
Get the
most recent version of
the Ball Blue Book
