
Looking for How to Make How to freeze pumpkin from your garden (directions, recipe, with photos) - Easily! With Step-by-step Photos, Recipe, Directions, Ingredients and Costs in 2025? Scroll down this page and follow the links.
And if you bring home some fruit or vegetables and want to can, freeze, make
jam, salsa or pickles, see this
page for simple, reliable, illustrated canning, freezing or preserving
directions. There are plenty of other related resources, click on the resources dropdown above. If you are having a hard time
finding
canning lids, I've used these, and they're a great price &
ship in 2 days.
If you have questions or feedback, please let me know! There
are affiliate links on this page. Read our disclosure policy to learn more.
How to Make How to freeze pumpkin from your garden (directions, recipe, with photos) - Easily! With Step-by-step Photos, Recipe, Directions, Ingredients and Costs
How to Cook a Pumpkin to Have Pumpkin Puree to Freeze for Recipes Later
Click here for a PDF print version
You probably take canned pumpkin for granted. You're there, the can is
there, there's a pumpkin on the label... open it and mix it up with spices to
make a pie, right. Ah, but a pumpkin pie, pumpkin soup, pumpkin bread made
from a fresh pumpkin tastes so much better than the glop that was processed last
year! Here's how to do it, complete instructions in easy steps and completely
illustrated. And it is much easier than you think, using my "patented" tips and
tricks!
Directions for Making Pumpkin Filling from Scratch
To Freeze or Use Fresh
Ingredients and Equipment
- a pie pumpkin (see step 1)
- A sharp, large serrated knife
|
- an ice cream scoop
- a large microwaveable bowl or large pot
|
Recipe and Directions
Step 1 - Get your pie pumpkin
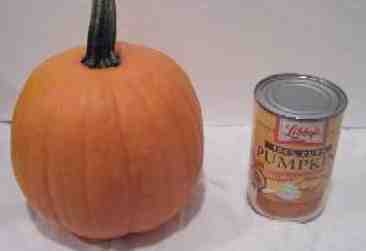 "Pie
pumpkins" are smaller, sweeter, less grainy textured pumpkins than the usual
jack-o-lantern types. grocery stores usually carry them in late September
through December in the U.S. Note: the Libby's can of cooked pumpkin
is just there for reference - it is the small can, so that gives you an idea of
the size of a typical pie pumpkin. They're only about 8 inches in
diameter.
"Pie
pumpkins" are smaller, sweeter, less grainy textured pumpkins than the usual
jack-o-lantern types. grocery stores usually carry them in late September
through December in the U.S. Note: the Libby's can of cooked pumpkin
is just there for reference - it is the small can, so that gives you an idea of
the size of a typical pie pumpkin. They're only about 8 inches in
diameter.
Just like selecting any squash, look for one that is firm, no bruises or soft
spots, and a good orange color.
Yield: Pie pumpkins are small, usually only 6 inches in diameter. You
can usually obtain about 2 or 3 cups or puree per pumpkin.
Step 2 - Prepare the pumpkin for cooking
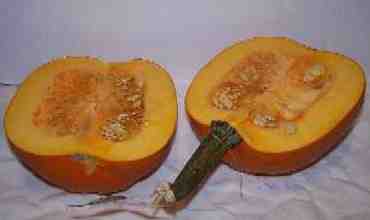 Wash
the exterior of the pumpkin in cool or warm water, no soap.
Wash
the exterior of the pumpkin in cool or warm water, no soap.
Cut the pumpkin in half. A serrated knife and a sawing motion works
best - a smooth knife is more likely to slip and hurt you!
Step 3 - Scoop out the seeds...
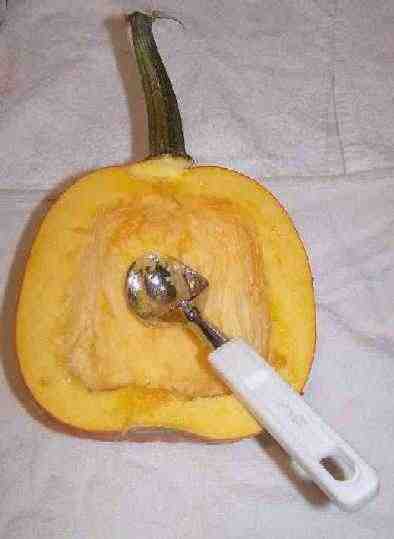 And
scrape the insides. You want to get out that stringy, dangly stuff that
coats the inside surface. I find a heavy ice cream scoop works great for
this.
And
scrape the insides. You want to get out that stringy, dangly stuff that
coats the inside surface. I find a heavy ice cream scoop works great for
this.
Note: SAVE THE SEEDS:
The seeds can be used either to plant pumpkins next year, or
roasted to eat this year! Place them in a bowl of water and rub them between
your hands. then pick out the orange buts (throw that away) and drain off
the water. Spread them out on a clean towel or paper towel to dry and they're
ready to save for next year's planting or roast.
Click here for roasting instructions!
(opens in a new window)
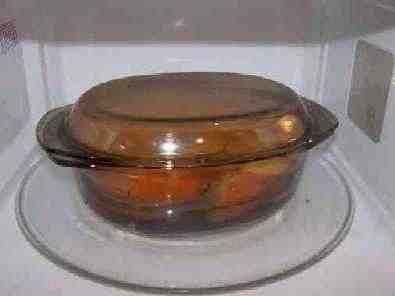
Step 4 - Put it in a microwaveable bowl
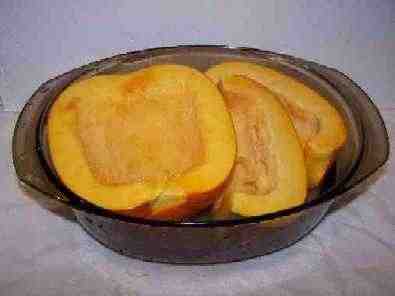 Remove
the stem, and put the pumpkin into a microwaveable. You may need to cut the
pumpkin further to make it fit. The fewer the number of pieces, the easier
it will to scoop out the cooked pumpkin afterwards.
Remove
the stem, and put the pumpkin into a microwaveable. You may need to cut the
pumpkin further to make it fit. The fewer the number of pieces, the easier
it will to scoop out the cooked pumpkin afterwards.
Put a couple of inches of water in the bowl, cover it, and put in the
microwave.
Step 5 - Cook the pumpkin until soft
 Cook
for 15 minutes on high, check to see if it is soft, then repeat in smaller
increments of time until it is soft enough to scoop the innards out.
Normally it takes 20 or 30 minutes in total.
Cook
for 15 minutes on high, check to see if it is soft, then repeat in smaller
increments of time until it is soft enough to scoop the innards out.
Normally it takes 20 or 30 minutes in total.
Note: You CAN cook it on the stovetop; it will just take longer (almost twice
as long)
Step 6 - Scoop out the cooked pumpkin
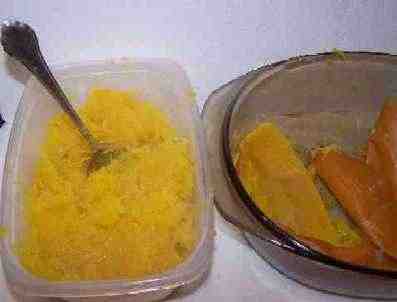 Using
a broad, smooth spoon, (such as a tablespoon) gently lift and scoop the cooked
pumpkin out of the skin. It should separate easily an in fairly large
chucks, if the pumpkin is cooked enough.
Using
a broad, smooth spoon, (such as a tablespoon) gently lift and scoop the cooked
pumpkin out of the skin. It should separate easily an in fairly large
chucks, if the pumpkin is cooked enough.
Step 7 - Puree the pumpkin
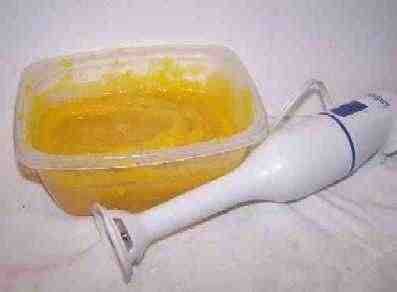 To
get a nice, smooth consistency, I use a Pillsbury hand blender. A regular
blender works, too (unless you made a few frozen daiquiris and drank them
first..). Or even just a hand mixer with time and patience.
To
get a nice, smooth consistency, I use a Pillsbury hand blender. A regular
blender works, too (unless you made a few frozen daiquiris and drank them
first..). Or even just a hand mixer with time and patience.
With the hand blender, it just takes 2 or 3 minutes!
Step 8 - Done with the pumpkin!
The pumpkin is no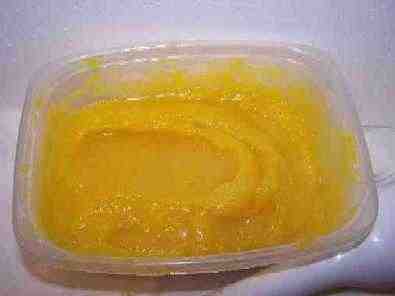 w
cooked and ready for freezing or pie recipe. Get the frozen daiquiris out
from step 7 and take a break! :)
w
cooked and ready for freezing or pie recipe. Get the frozen daiquiris out
from step 7 and take a break! :)
You can pack it containers, like Ziploc bags or plastic containers, exclude
as much air as you can, and freeze it!
... or to start making tasty treats.
how about ...
I love the FoodSavers (see
this page for more information) with their vacuum sealing! Here's
an example of one model:
FoodSaver V2840 Advanced Design
This one is the least expensive of the Food Saver models that has all the
advamced features, like automatic bag detection and sealing, which makes it
faster and easier to seal. And yes, you can seal and freeze foods with
liquids (just freeze the unsealed bag in the freezer overnight, THEN seal
it!)

About $135
 
Features
- Home vacuum-packaging system vacuums, seals, and shuts off
automatically
- Upright vacuum-sealing
appliance with SmartSeal technology keeps food fresh longer
-
Push-button operation;
built-in roll storage and cutter; automatic liquid detection
-
Crush-free instant seal;
2 vacuum speeds; 2 seal levels; progress lights; integrated
bag opener
-
Marinate and canister
modes; includes 3 quart-size bags, 2 gallon-size bags, and a
roll of bag material
-
Measures approximately 6
by 18-8/9 by 10-2/5 inches; 1-year limited warranty


Looking for canning equipment and supplies?
Water bath canner with a jar rack
Electric pressure canner
Pressure canners for gas, electric and induction stoves:
Presto 23Qt or
T-fal 22Qt
Canning scoop (this one is PERFECT)
Ball Blue book (most recent version)
Jars: 8oz canning jars for jams
Lids: Regular canning lids
Wide mouth canning lids
Find Other types of farms:
Easter egg hunts
Children's consignment sales
Farm markets and roadside stands
Road trips and camping resources
Local Honey, apiaries, beekeepers
Local Meat, Milk and Eggs
Consumer fraud and scams information
Home canning supplies at the best prices on the internet!
Maple Syrup Farms, sugarworks, maple syrup festivals
Environmental information and resources
Farms For Your Event for birthday parties, weddings, receptions, business meetings, retreats, etc.
Festivals - local fruit and vegetable festivals
Pumpkin patches and corn mazes
Christmas Tree Farms and lots
Get the
most recent version of
the Ball Blue Book
With this Presto 23 quart pressure canner and pressure cooker, you can "can" everything, fruits, vegetables, jams, jellies, salsa, applesauce, pickles, even meats, soups, stews. Model 01781

You can make jams, jellies, can fruit, applesauce, salsa and pickles with water bath canners, like this Granite Ware 12-Piece Canner Kit, Jar Rack, Blancher, Colander and 5 piece Canning Tool Set
|