
Looking for How to Make Mint Sauce - Canned or Refrigerator in 2024? Scroll down this page and follow the links. And if you bring home some fruit or vegetables and want to can, freeze, make jam, salsa or pickles, see this page for simple, reliable, illustrated canning, freezing or preserving directions. There are plenty of other related resources, click on the resources dropdown above. If you are having a hard time finding canning lids, I've used these, and they're a great price & ship in 2 days.
If you have questions or feedback, please let me know! There are affiliate links on this page. Read our disclosure policy to learn more.
How to Make Mint Sauce - Canned or Refrigerator
How to Make Homemade English Mint Sauce.
hat would roast lamb be without a traditional English mint sauce? Now you can make your own bottled / canned mint sauce! You can store it in your refrigerator or, if you have a Pressure Canner, on the shelf.
You do need to use a water bath canner if you want to store the jars without refrigerating them.

With a canner it's easy. See about selecting and using canners here!
So, here's how to make the mint sauce! The directions are complete with instructions in easy steps and completely illustrated. In the winter when you open a jar, the mint will taste MUCH better than any store-bought canned mint sauce (although I think frozen greens will taste ten times better than canned).
Prepared this way, the jars have a shelf life of about 8 months to a year, and aside from storing in a cool, dark place, require no special attention. If you'd rather freeze your mint, see my page on how to freeze mint and greens. Even easier than canning and they will taste just like fresh.. but it does take up space in the freezer.
Directions for Making Canned mint sauce
Yield: 1 cup of sauce per 2 cups of packed raw, fresh mint leaves.
Ingredients
- 1 cup finely chopped fresh mint leaves (that's about 1 pound of leaves - a loosely filled grocery store carrier bag full of mint stems with leaves)
- 2 cups malt vinegar ( white wine vinegar or apple cider vinegar will work, too)
- 2 to 4 tablespoons sugar
- Salt (optional - I don't use any)
Equipment
- Small (4 oz) canning / preserving bottles for storage (Publix, Kroger, other grocery stores and some "big box" stores carry them - now about $12 per dozen quart jars (up 50% in 2 years!) including the lids and rings)
- Jar grabber (to pick up the hot jars)
- Jar funnel ($4 at mall kitchen stores and local "big box" stores, but it's usually cheaper online from our affiliates)
- At least 1 large pot
- 1 water bath canner (a large water bath pot with a lifting rack to sanitize the jars after filling (about $25 to $55 at mall kitchen stores and "big box" stores, but it is cheaper online; see this page for more information). For low acid foods (most vegetables, you can't use an open water bath canner, it has to be a pressure canner to get the high temperatures to kill the bacteria. If you plan on canning every year, they're worth the investment.
- Large spoons and ladles,
Recipe and Directions
Step 1 - Selecting the mint
The most important step! You need mint that are FRESH and crisp. Limp, old mint will make nasty tasting canned mint. Guests will probably throw them at you.. Select filled but tender, firm, crisp mint. Discard any wilted, discolored, diseased, or insect- damaged leaves. Leaves should be tender and attractive in color.
How much mint and where to get them
You can grow your own, pick your own, or buy them at the grocery store. 1 cup of raw leaves makes 1/2 cup of finely chopped leaves, and that makes about 1/2 cup (4 ounces) of sauce. So, an average of 1 pound is needed to make each two 4 ounce jars. But really, all that matters is that you measure the finely chopped leaves!
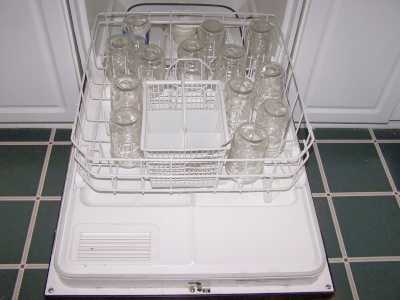
Step 2 - Prepare the jars and canner
Wash the jars and lids
This is a good time to get the jars ready! The dishwasher is fine for the jars; especially if it has a "sanitize" cycle. Otherwise put the jars in boiling water for 10 minutes. I just put the lids in a small pot of almost boiling water for 5 minutes, and use the magnetic "lid lifter wand" (available from target, other big box stores, and often grocery stores; and available online - see this page) to pull them out.
Get a large pot of water boiling
We will use this water to pour over the mint and fill each jar with liquid, after we've packed them full of mint. I use the largest pot I have, so that there is plenty of clean, boiling water ready when I need it.
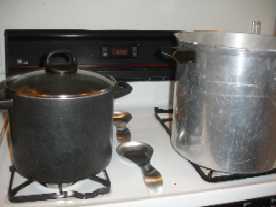
Get the water bath canner heating up
Rinse out your water bath canner, put the rack plate in the bottom, and fill it to the fill line with hot tap water. (of course, follow the instruction that came with the canner, if they are different). Put it on the stove over low heat, with the lid OFF of it, just to get it heating up for later on.
Step 3 -Wash the mint!
I'm sure you can figure out how to rinse the mint in plain cold or lukewarm water. Wash only small amounts of mint at one time. Drain water and continue rinsing until water is clear and free of grit.
Step 4 - pick off the leaves and chop them
You just want healthy, green leaves. Pick off the leaves and discard everything else.
Chop the leaves into fine pieces. A blender works very well, using a little of the vinegar, just enough to keep it moving. (Purists, and perhaps Gordon Ramsey, will insist on hand chopping the leaves; I just haven't got that much free time!)
Step 5 - Cooking
Bring the remaining vinegar to a simmer in a small saucepan, add the sugar and chopped leaves. This is both cooking and blanching. It stops the bacteria and enzymes from degrading the quality during storage.
Simmer for about 20 minutes. You can vary the sugar or water to taste.
Step 6 - Packing the mint sauce in the canning jars
A funnel works well to add the sauce, but stir as you pour it in. The mint tends to settle to the bottom of the jar, stirring helps to get an even mix. Be sure to leave 1/2 inch of space at the TOP of the jar. That is called "headspace" and is needed for expansion during heading.
Now, if you don't have a water bath canner, just stop here! Let the jars cool for an hour, then pop them into your refrigerator, where they will be good for 3 to 6 months!
Step 7 - Put the lids and rings on
Put the lids on each jar and seal them by putting a ring on and screwing it down snugly (but not with all your might, just "snug"). Those outside the U.S. generally won't have access to these jars and just use a single lid system. Just snug the lid on and carry on to step 8.
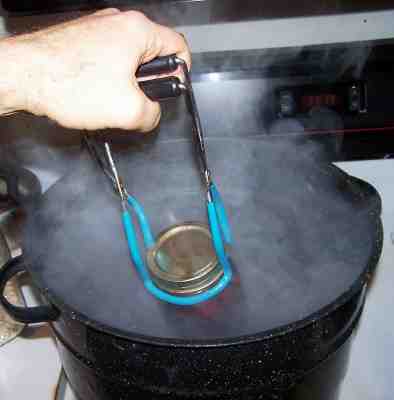
Step 8- Put the jars in the canner and the lid on the canner
 Using
the jar tongs, put the jars on the rack in the canner. Make sure
the tops of the jars are covered by at least 1 inch of water.
Using
the jar tongs, put the jars on the rack in the canner. Make sure
the tops of the jars are covered by at least 1 inch of water.
Step 9 - Process for 20 minutes*
The chart below will help you determine the right processing time and water bath, if you have a different type of canner, or are above sea level. There is no lab tested recipe from the USDA for mint sauce, so these times are approximations from their pickled beets recipe, which also uses vinegar and ought to be similar. But I offer the recipe "as is" since I haven't got a lab-tested version to use as a basis. You can always just refrigerate it without canning the mint sauce.
For most people, using a plain open water bath canner, the time will be between 20 to 35 minutes. You can use either a plain water bath canner OR a pressure canner, since the vinegar adds so much acidity (if you can vegetables other than tomatoes without adding vinegar, you must use a pressure canner).
*Recommended Processing times For Mint Sauce in A Boiling Water (Open) Bath Canner |
||||||
|
PROCESS TIMES (MIN) AT ALTITUDES OF: |
||||||
| Canned Product | Style of Pack | Jar Size | 0-1000 ft. | 1001-3000 ft. | 3001-6000 ft. | Above 6000 ft. |
| Pickled Cabbage | Hot | Pints or Quarts | 20 | 25 | 30 | 35 |
|
Recommended process time for mint sauce in a dial-gauge pressure canner. |
|||||
| Canner Pressure (PSI) at Various Altitudes for Dial-Type Pressure Canners | |||||
| Jar Size | Process Time | 0 - 2,000 ft | 2,001 - 4,000 ft | 4,001 - 6,000 ft | 6,001 - 8,000 ft |
| Pints | 20 min | 11 lb | 12 lb | 13 lb | 14 lb |
| Quarts | 25 | 11 | 12 | 13 | 14 |
It is important to learn how to operate your pressure canner by reading the
owner's manual that came with your particular canner. If you cannot find your
owner's manual, you can obtain find one online: Here is where to find some
common manufacturer's manuals:
or by contacting the company that made your canner. Give the model number to the manufacturer, and they will send you the right manual. Click here for more information about pressure canners and a variety of models you can order.
Step 10 - Remove the jars
Lift the jars out of the water and let them cool on a wooden cutting board or a towel, without touching or bumping them in a draft-free place (usually takes overnight), here they won't be bumped. You can then remove the rings if you like, but if you leave them on, at least loosen them quite a bit, so they don't rust in place due to trapped moisture. Once the jars are cool, you can check that they are sealed verifying that the lid has been sucked down. Just press in the center, gently, with your finger. If it pops up and down (often making a popping sound), it is not sealed. If you put the jar in the refrigerator right away, you can still use it. Some people replace the lid and reprocess the jar, then that's a bit iffy. If you heat the contents back up, re-jar them (with a new lid) and the full time in the canner, it's usually ok. You're done!
Other Equipment:
From left to right: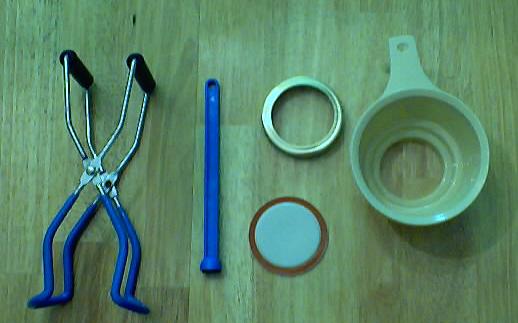
- Jar lifting tongs to pick up hot jars
- Lid lifter - to remove lids from the pot of boiling water (sterilizing )
- Lids- disposable - you may only use them once
- Ring - holds the lids on the jar until after the jars cool - then you remove them, save them and reuse them
- Canning Jar funnel - to fill the jars
Frequently Asked Questions
Q. Cloudiness: When I can mint (or yellow) I seem to develop a cloudy murkiness in the jar. No one seems to know why this happens and it is very frustrating. I have tried both canning salt and table salt and it still seems to do this. This year I tried bottled water thinking there may be something in my cities water, but alas, I still have this cloudiness.
A. There are a number of potential causes to cloudiness:
1. Be sure to use a NON-metal pot - or a coated metal (teflon, silverstone, enamel, etc.) without breaks in the coating. the metal reacts with acids (such as vinegar and natural acidity) and makes the solution turn cloudy. This is the most common cause of cloudy pickled vegetables.
2. Sometimes the fillers (anticaking agents) in regular table salt may cause slight cloudiness, so always use canning or pickling salt, which is better than kosher salt. It is available with the canning supplies in most large grocery stores.
3. Hard water might also cause cloudiness. Minerals in hard water can give a cloudy appearance. If soft water is not available, boil the hard water and let it sit undisturbed overnight. Pour off the top portion and use it in the solution.
The cloudiness caused by these first 4 conditions is not dangerous and usually doesn't affect the taste.
4. Finally, it could be spoilage due to improper processing. Do not consume them in this case. Check for spoilage using the usual methods (look for a leaking container, damaged lid, lid that is not sucked down (no vacuum), visible signs of growth, bad odors, etc.)
Pressure canners!If you want to can low-acid foods such as red meats, sea food, poultry, milk, and all fresh vegetables with the exception of most tomatoes, you will need a Pressure Canner. These foods fit into the low acid group since they have an acidity, or pH level, of 4.6 or greater. The temperature which must be reached and maintained (for a specified amount of time) to kill the bacteria is 240 F. Pressure canning is the only canning method recommended safe by the U.S.D.A. for low-acid foods such as vegetables, meats, and fish. Ordinary water bath canners can only reach 212 F and cannot to kill the types of bacteria that will grow in low acid foods. This temperature can be reached only by creating steam under pressure as achieved in quality pressure canners. There are several manufacturers of pressure canners. The two leading ones are Presto and All American (Wisconsin Aluminum). They are more expensive than water bath canners, but extremely well built - I bought mine in 1988 and it still looks and works like new! |
|||
|
|
Presto 01781 23-Quart Pressure Cooker/CannerThis is usually one of the best-priced pressure canners. They are reliable and inexpensive. I've had mine for 40 years. There is also a 16 quart version for even less. Click on the links at left or above for more info and current pricing. |
||
|
|
Shown at left is the Presto 23 quart pressure canner. Features below and
click here for more information or to purchase from Target.
See the seller's website for more information, features, pricing and user reviews! |
||
| See here for related tools, equipment, supplies on Amazon See here for related tools, equipment, supplies on Amazon |
All American Pressure Canner and Cooker #921Features:
|
||
| See here for related tools, equipment, supplies on Amazon |
|
||
|
See here for related tools, equipment, supplies on Amazon
See here for related tools, equipment, supplies on Amazon
See here for related tools, equipment, supplies on Amazon
In the UK, use this link: |